















On this page
- What is a WordPress client portal?
- Why build your client portal on WordPress?
- Three ways to build a client portal in WordPress
- The tool we will use: DoubleScale
- Before you start: a 5-minute checklist
- Step 1: Install the plugin
- Step 2: Check the portal page and shortcode
- Step 3: Choose what clients see in the portal
- Step 4: Set up customer accounts
- Step 5: Decide which files clients can upload
- Step 6: Write a welcome message
- Step 7: Give one client different access
- Step 8: Choose what clients see in each project
- Step 9: Test the portal as a client
- What your clients see: a tour of the portal
- How to launch the portal to existing clients
- Client portal security checklist
- Common mistakes to avoid
- Troubleshooting
- Free vs paid: what you can do on each plan
- Questions people ask
Every client relationship produces the same pile of paperwork: the proposal they need to approve, the invoice they cannot find, the file they emailed to the wrong person, the “quick question” buried in a thread of forty replies. A client portal puts all of it in one private place your client can open any time, without asking you.
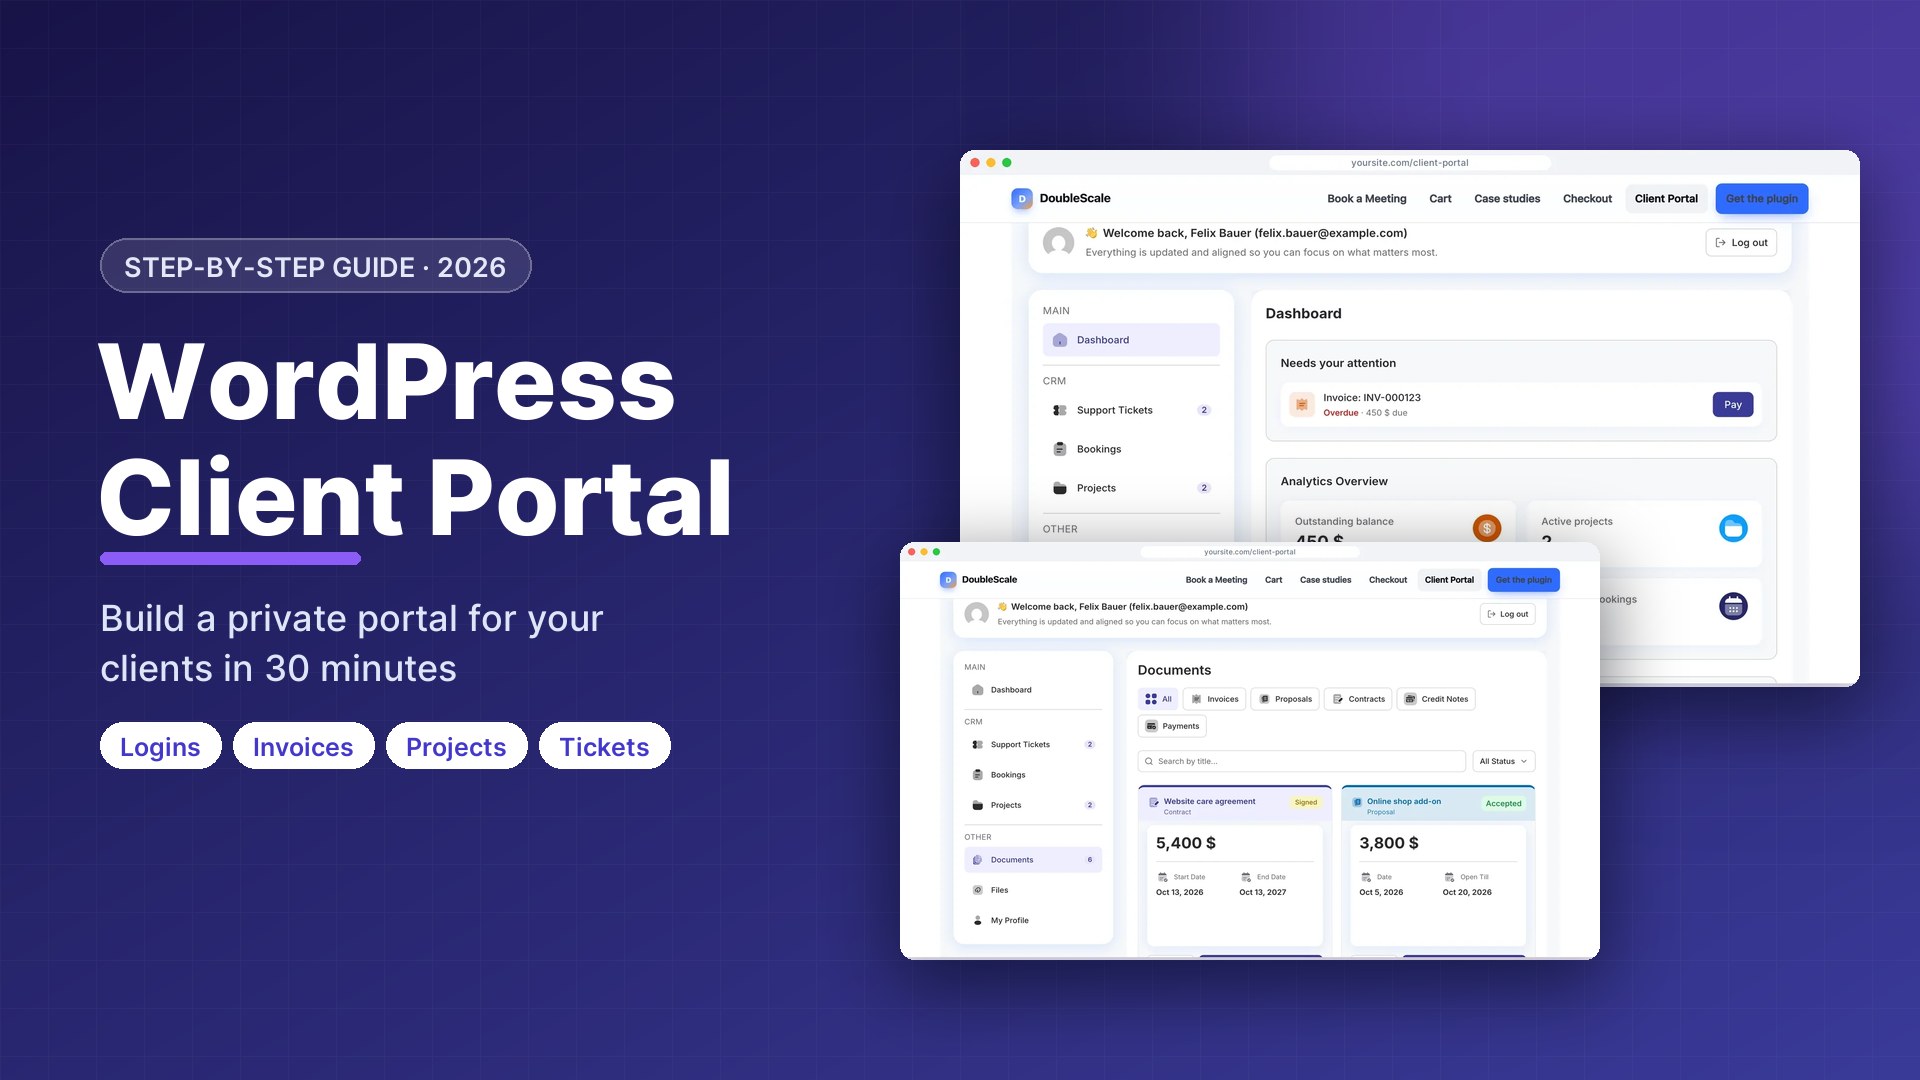
If your business already runs on WordPress, you do not need a separate monthly subscription to give clients that experience. In this guide you will build a complete WordPress client portal: a login page on your own site where each client sees only their own projects, invoices, proposals, contracts, support tickets, bookings and files. Every step comes with a screenshot of the actual setting, so you can follow along on your own site.
A branded portal page on your domain, with a secure login for each client.
Client accounts created automatically when someone fills in a form, books a call or becomes a customer.
Control over exactly what clients see, for everyone at once or for one client at a time.
A portal where clients approve proposals, pay invoices, open support tickets, manage bookings and upload files.
Time needed: about 30 minutes. Cost: free to start. You need: a WordPress site with HTTPS and administrator access.
What is a WordPress client portal?
A client portal is a private, password-protected area of your website where each client logs in and sees the information that belongs to them, and nothing else. Think of it as a self-service front desk: instead of emailing you for an invoice copy or a project update, the client signs in and finds it.
A WordPress client portal does this on your own WordPress site rather than on a third-party platform. Clients log in at an address like yoursite.com/client-portal, the pages carry your branding, and the data lives in your own WordPress database.
A well-built portal usually lets clients:
- Follow projects: progress, due dates, tasks and the documents linked to each project.
- Handle money: read proposals, accept them, view invoices and pay them online.
- Sign agreements: read contracts and sign them electronically.
- Get support: open tickets and follow every reply in one thread.
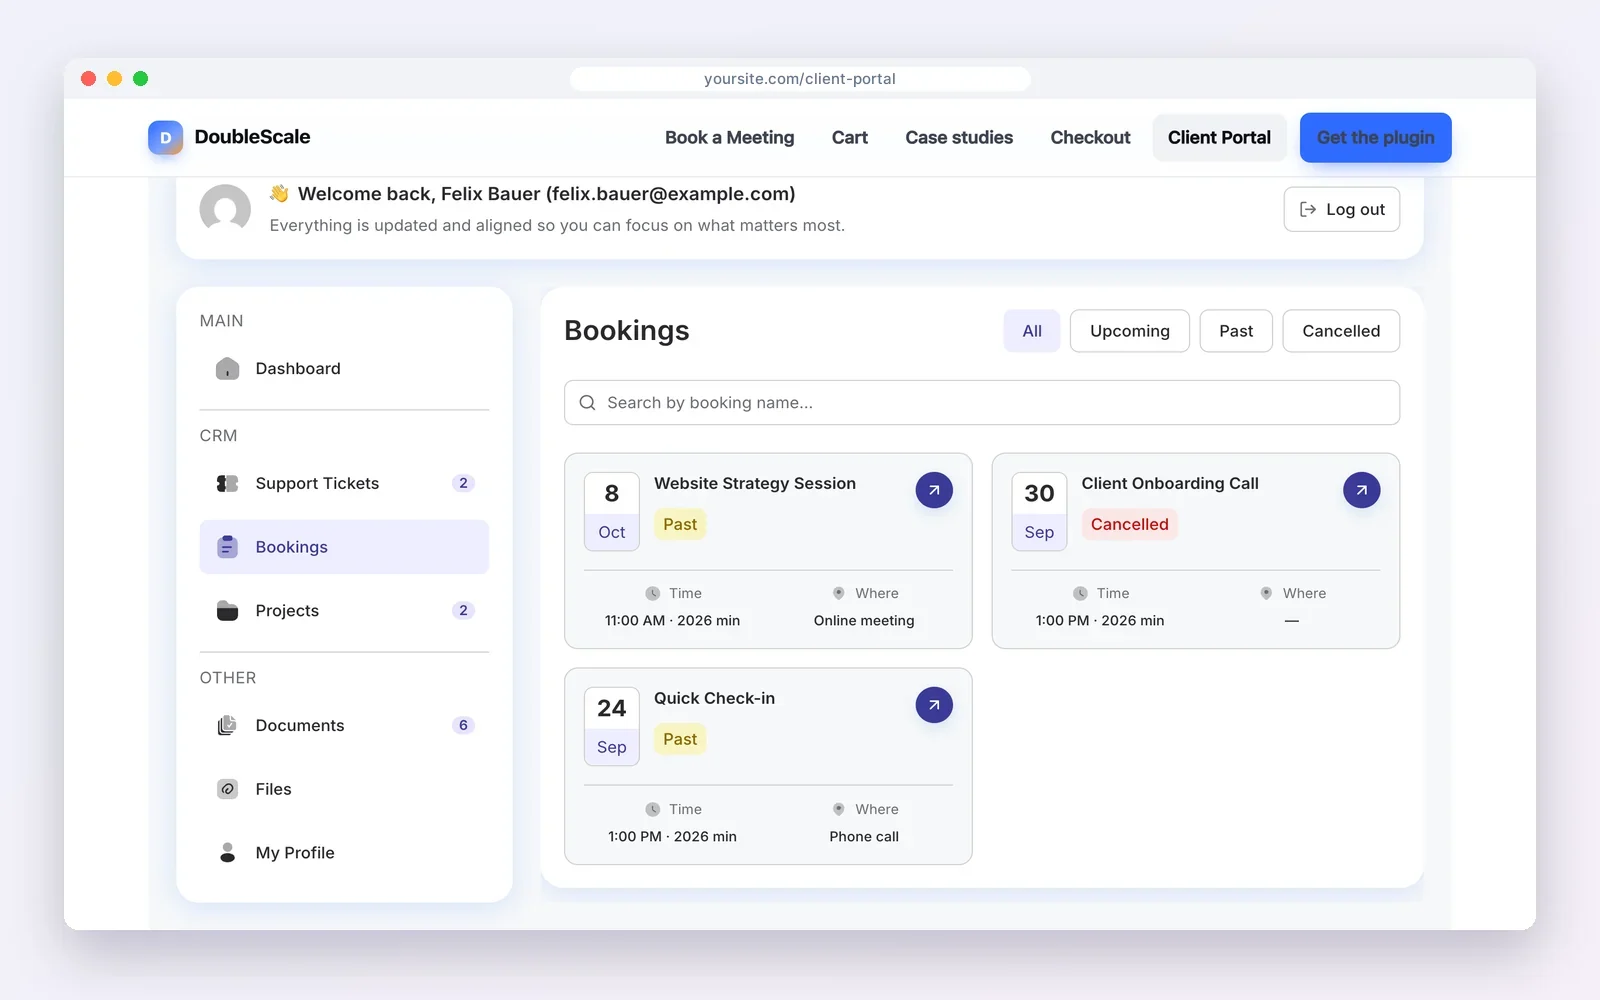
- Manage meetings: see, reschedule or cancel their bookings.
- Exchange files: upload briefs, logos or ID documents securely, instead of by email.
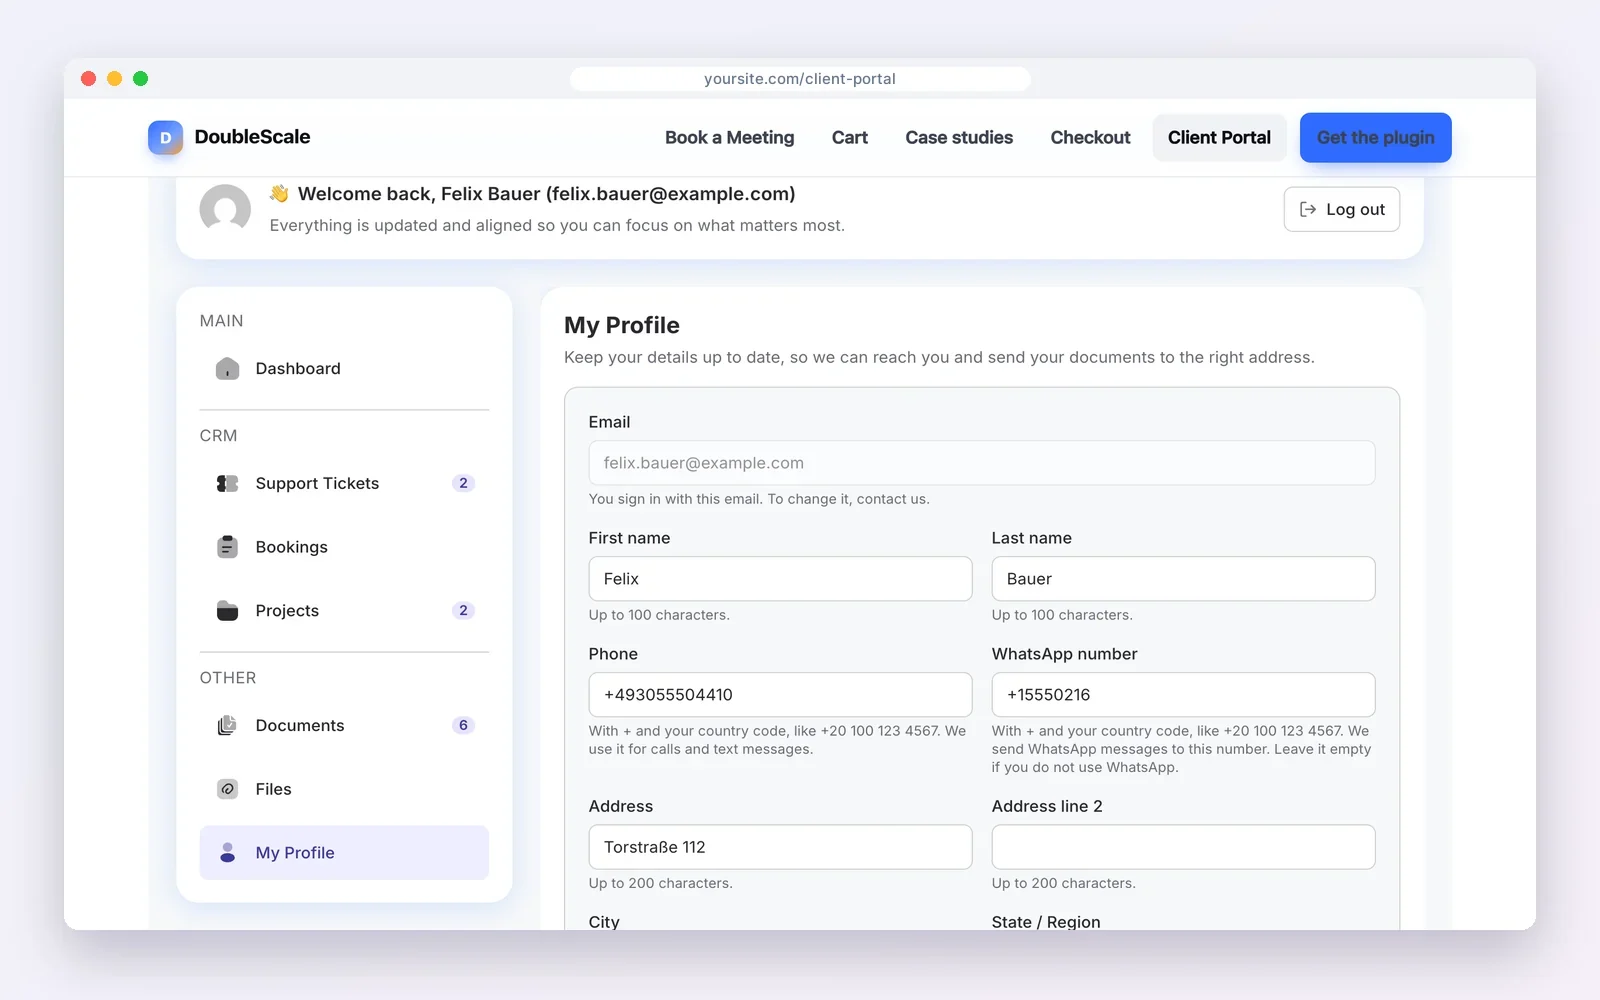
- Keep details current: update their own phone number and address.
Why build your client portal on WordPress?
Hosted portal tools work well, but they add another login, another monthly bill and another place where client data lives. Building the portal on the WordPress site you already own has four practical advantages:
| Portal on your WordPress site | Hosted portal platform | |
|---|---|---|
| Where clients log in | Your own domain | The vendor’s domain or a custom subdomain |
| Where data lives | Your WordPress database | The vendor’s servers |
| Branding | Your theme, logo and colours | Depends on the plan (white label often costs extra) |
| Pricing | Free or a flat yearly licence per site | Monthly subscription, often per user or per seat |
| Connection to your website | Native: forms, WooCommerce, bookings and users | Through integrations or Zapier |
The trade-off is that you are responsible for hosting, backups and security updates, just as you are for the rest of your site. We cover a security checklist later in this guide.
Three ways to build a client portal in WordPress
Before choosing a tool, it helps to know the three approaches people use, because they produce very different portals:
- Private pages. A plugin creates one private page per user that only that user can open. It is simple and free, but every update is manual: you edit each client’s page by hand.
- A membership plugin with restricted content. You lock pages behind a login and show content by role. It works for courses and communities, but there are no invoices, projects or tickets unless you add more plugins.
- A CRM with a built-in portal. The portal reads from the same records your team already uses: contacts, projects, invoices, tickets and bookings. When you send an invoice or reply to a ticket, the client sees it in the portal automatically. Nothing is updated twice.
For service businesses, agencies, consultants and freelancers, the third approach is the one that saves time, because the portal maintains itself. That is the approach this guide follows. If you want to compare specific tools first, we reviewed them in the best WordPress client portal plugins.
The tool we will use: DoubleScale
This guide uses DoubleScale, a CRM plugin that runs inside WordPress. It manages contacts, sales, invoices, support tickets, bookings and projects from your WordPress dashboard, and it includes a client portal that shows each client their own records from those modules.
Two things make it a good fit for a first portal. First, the plugin and its client portal are free on WordPress.org; paid plans add extra portal areas such as projects, contracts and file uploads. Second, it is modular: you switch on only the parts you need, so a consultant who only wants invoices and tickets is not buried under features built for a sales team.
Disclosure: DoubleScale is our product. Everything below uses real screens from a standard installation, and we point out which settings need a paid plan.
Before you start: a 5-minute checklist
- HTTPS is on. Clients will enter passwords and see invoices. Your address bar must show a padlock.
- Your site can send email. Clients receive a “set your password” email and portal notifications. If WordPress emails tend to land in spam, set up an SMTP service first: see our WordPress SMTP guide.
- You know what clients should see. Write down the 3 to 5 things clients ask you for most often. Those are the areas you will switch on.
- Caching is under control. If you use a page cache, plan to exclude the portal page so each client always sees their own data.
Step 1: Install the plugin
- In your WordPress dashboard, go to Plugins → Add New Plugin.
- Search for DoubleScale, click Install Now, then Activate.
- Open DoubleScale in the admin menu and complete the short setup (business name, currency and the modules you want).
You can also download it from its WordPress.org page. On activation, DoubleScale creates the client portal page for you, so there is nothing to build by hand.
Step 2: Check the portal page and shortcode
Go to DoubleScale → Settings → Client Portal. The first card tells you whether your portal page is live, with buttons to view or edit it.
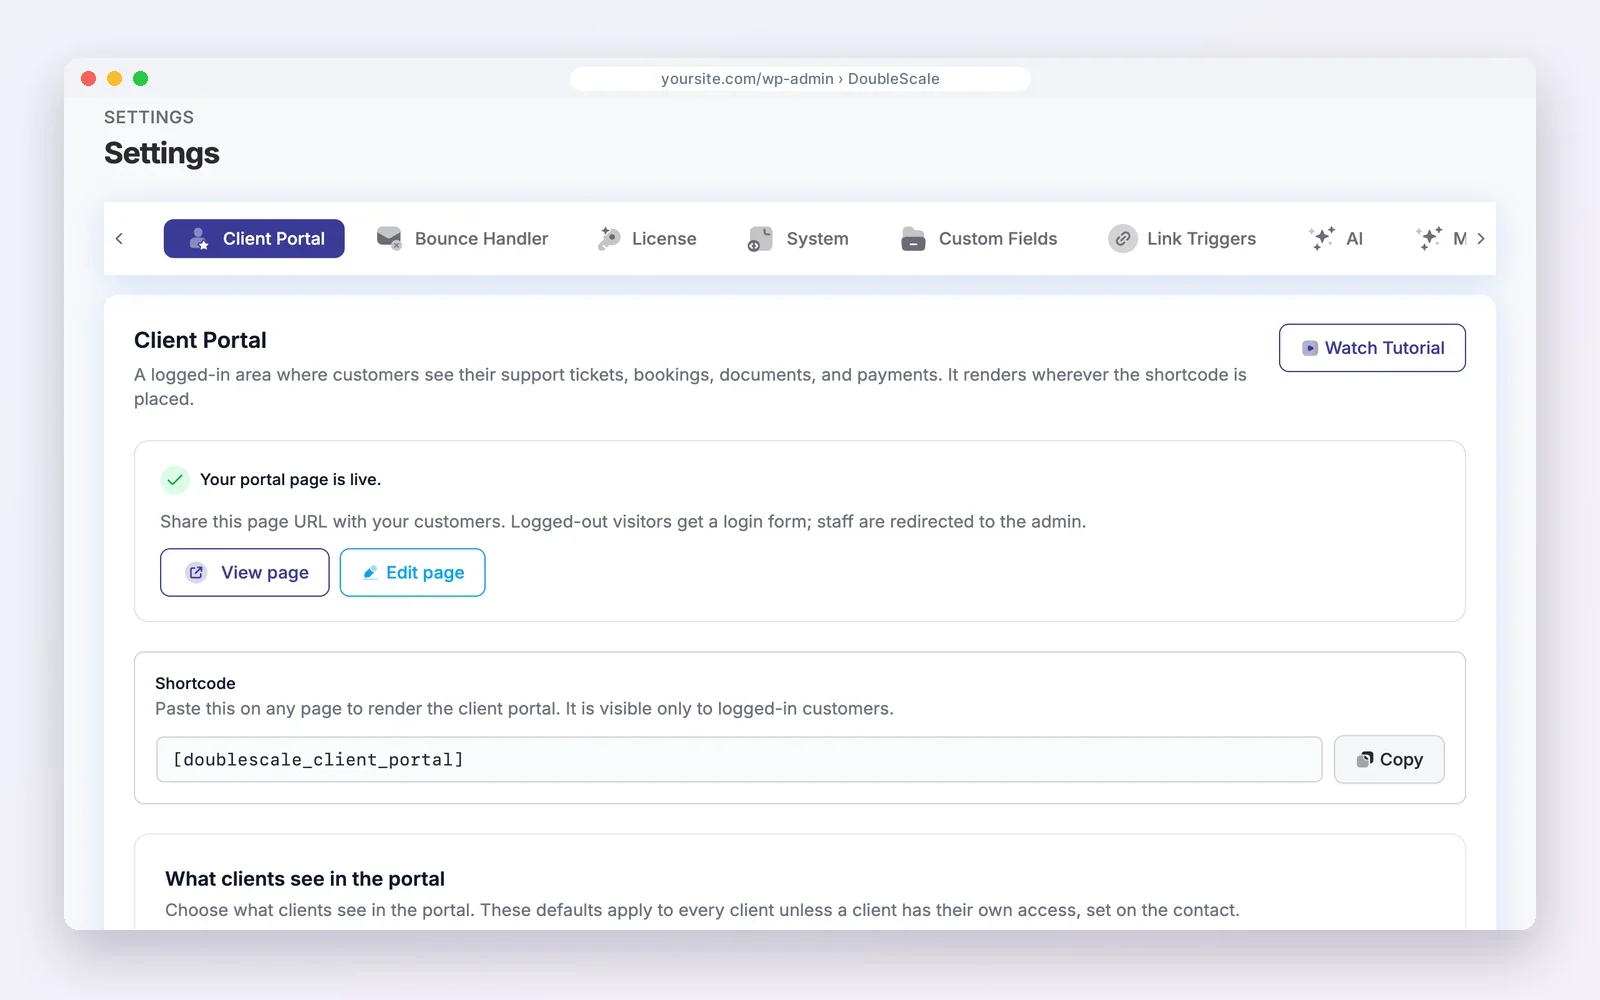
Three details are worth knowing:
- The portal is a normal WordPress page. It contains the shortcode
, so it inherits your theme’s header, footer and fonts. You can rename the page, change its address (for example /my-account/ or /clients/) and add it to your menu. - Logged-out visitors see a login form. Anyone who opens the page without signing in gets a login screen, not your data.
- Staff are sent to the admin. Team members who open the portal are redirected to the WordPress dashboard, where they manage everything.
If the page was ever deleted, a Create page button appears here to rebuild it in one click. You can also paste the shortcode on any other page, such as a landing page built with your page builder.
Step 3: Choose what clients see in the portal
Scroll down to What clients see in the portal. This is the most important setting in the whole portal: it decides which areas appear in every client’s menu. These are your defaults; in Step 7 you will see how to change them for one client.
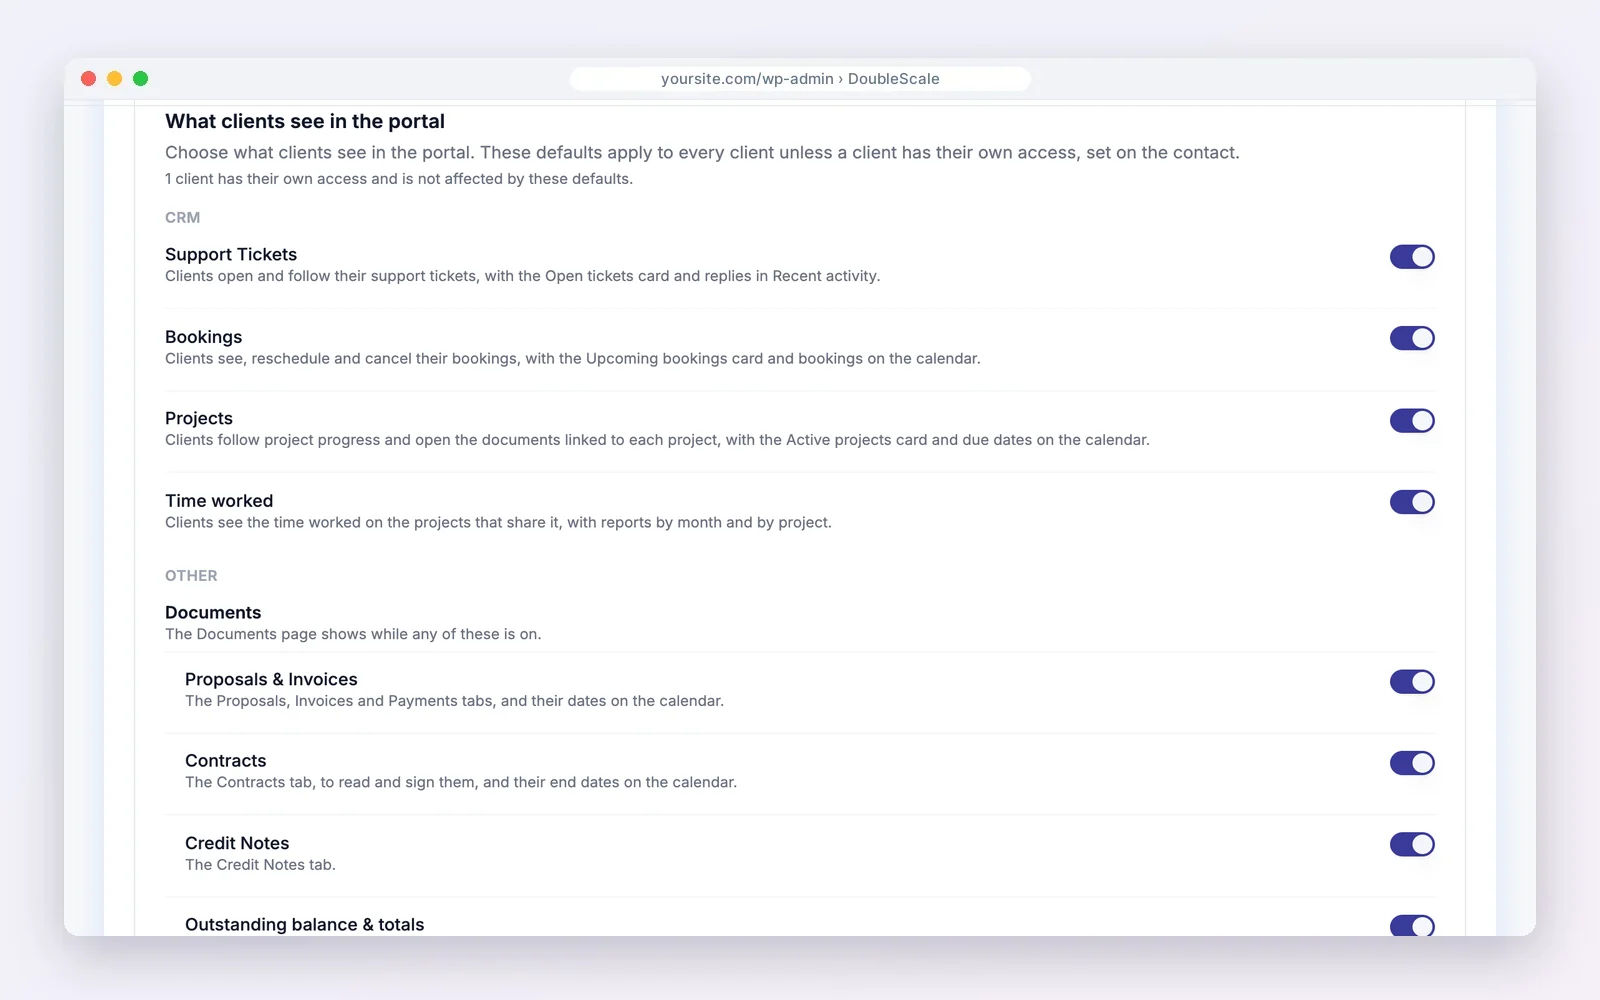
Here is what each switch does, and which ones are included in the free plugin:
| Area | What the client gets | Plan |
|---|---|---|
| Support Tickets | Open and follow their tickets, with an Open tickets card and replies in Recent activity | Free |
| Bookings | See, reschedule and cancel their bookings, with Upcoming bookings on the dashboard and the calendar | Free |
| Proposals & Invoices | The Proposals, Invoices and Payments tabs, and their dates on the calendar | Free |
| Outstanding balance & totals | The Outstanding balance card, the Total paid line and project amounts | Free |
| My Profile / Edit their details | Clients keep their name, phone and address up to date, or only view them | Free |
| Projects | Project progress, due dates and the documents linked to each project | Paid |
| Time worked | Time worked on projects that share it, with reports by month and project | Paid |
| Contracts | Read and sign contracts electronically, with end dates on the calendar | Paid |
| Credit Notes | A Credit Notes tab | Paid |
| Files | Clients upload files to their own record | Paid |
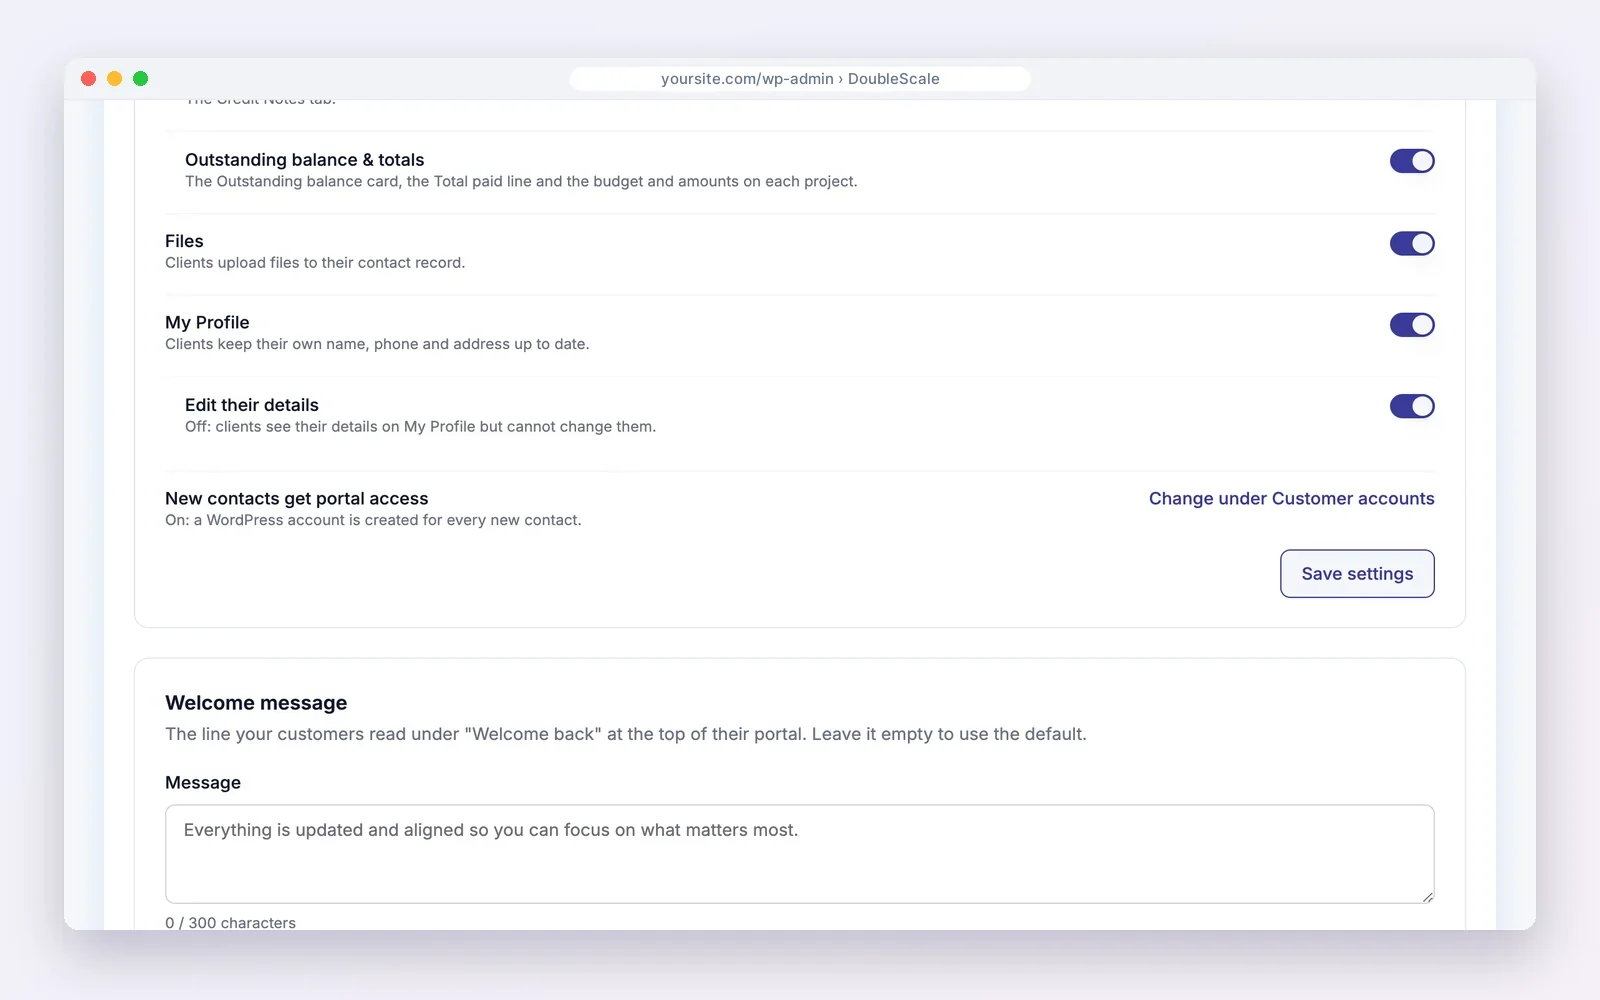
Two tips. First, start small: turn on only the areas clients actually ask about, then add more once they are using the portal. Second, a switch only works when its module is active. If, for example, Bookings is turned off in DoubleScale, the row tells you so and offers to turn it on.
Click Save settings when you are done.
Step 4: Set up customer accounts
A client can sign in once a WordPress user account with their email exists. The Customer accounts card decides how those accounts are created.
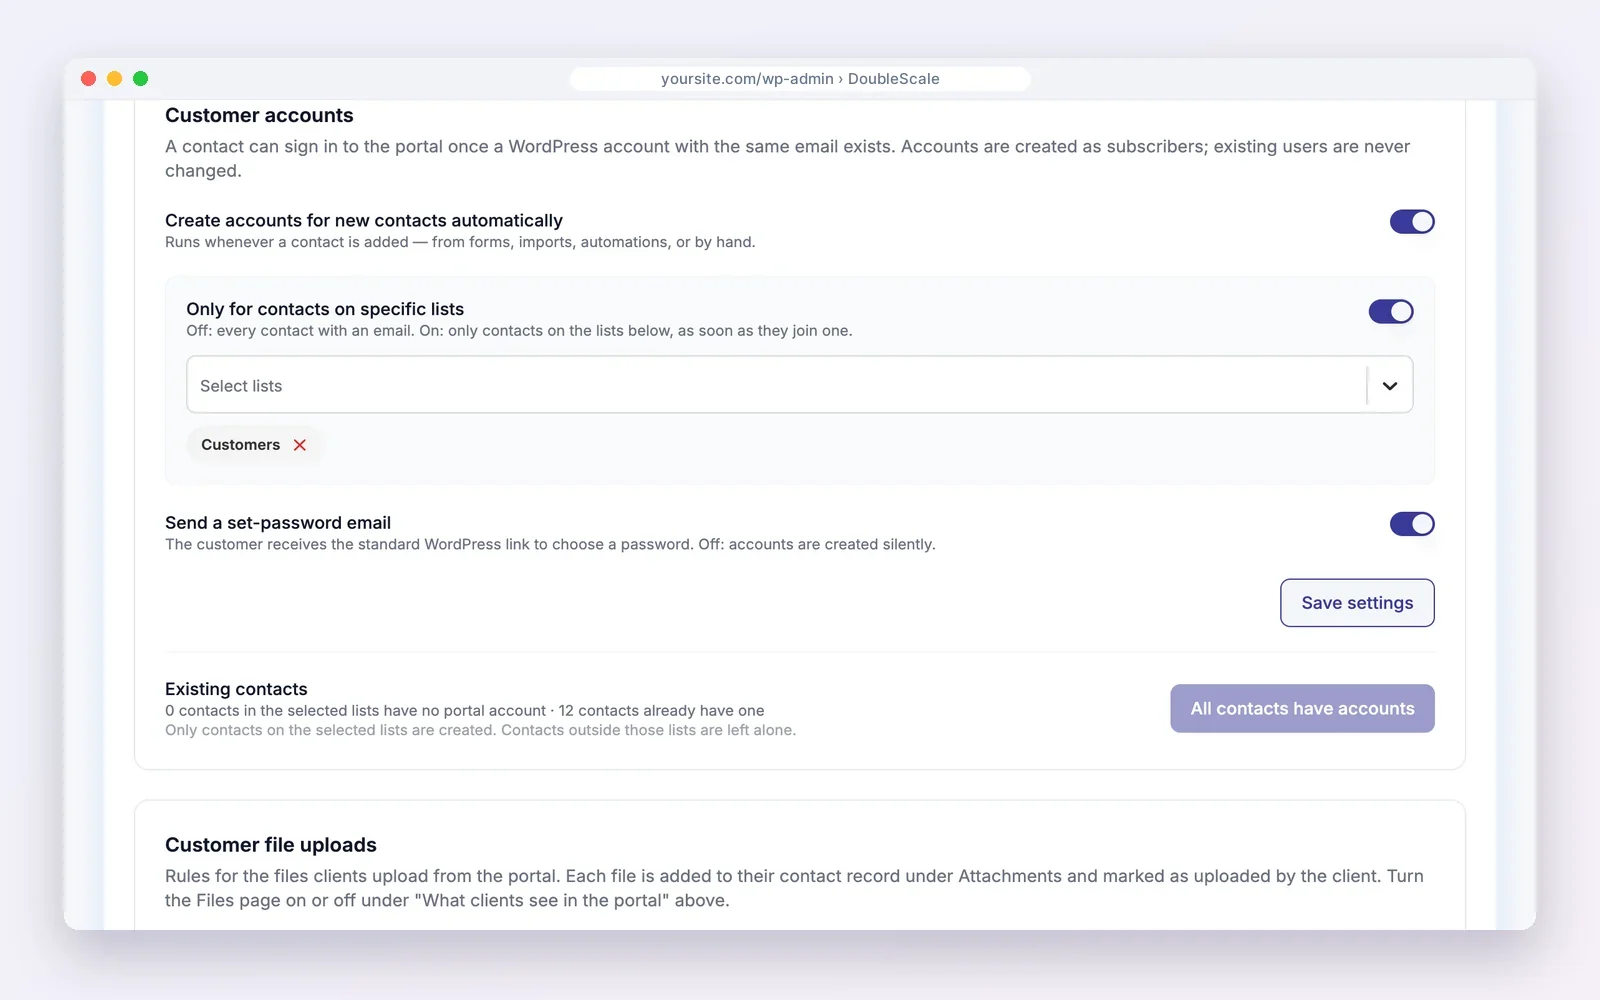
- Create accounts for new contacts automatically. Every time a contact is added, from a form, an import, an automation or by hand, DoubleScale creates their portal login. This is what makes the portal run itself.
- Only for contacts on specific lists. Turn this on if not every contact is a client. For example, create a list called Customers and only give portal access to contacts on it. Leads who downloaded a free guide will not get an account until they become customers.
- Send a set-password email. The client receives the standard WordPress link to choose their own password. Turn it off if you prefer to send your own welcome email first.
- Existing contacts. The card counts how many current contacts still have no account, and a button creates them all at once.
Good to know: accounts are created with the WordPress Subscriber role, so clients can never reach your dashboard. Existing WordPress users are never changed: if someone already has an account with that email, it is simply linked to their contact record.
Step 5: Decide which files clients can upload
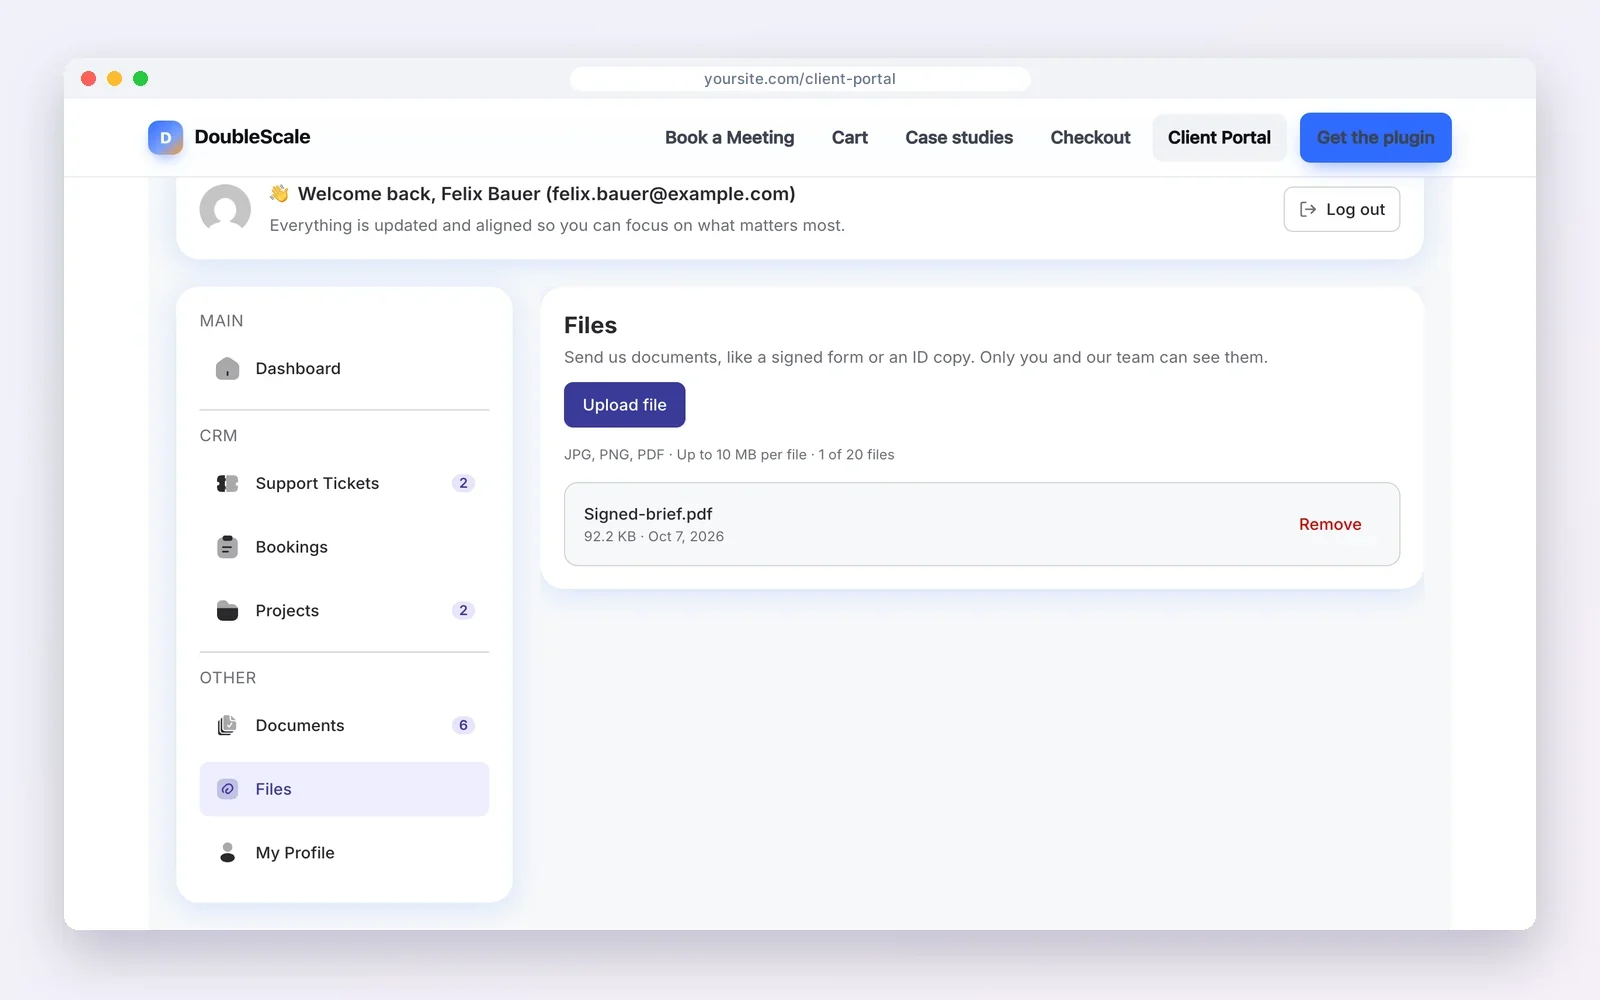
If you turned on the Files area, the Customer file uploads card sets the rules. Every uploaded file is added to the client’s contact record under Attachments and marked as uploaded by the client, so your team finds it next to their emails and invoices.
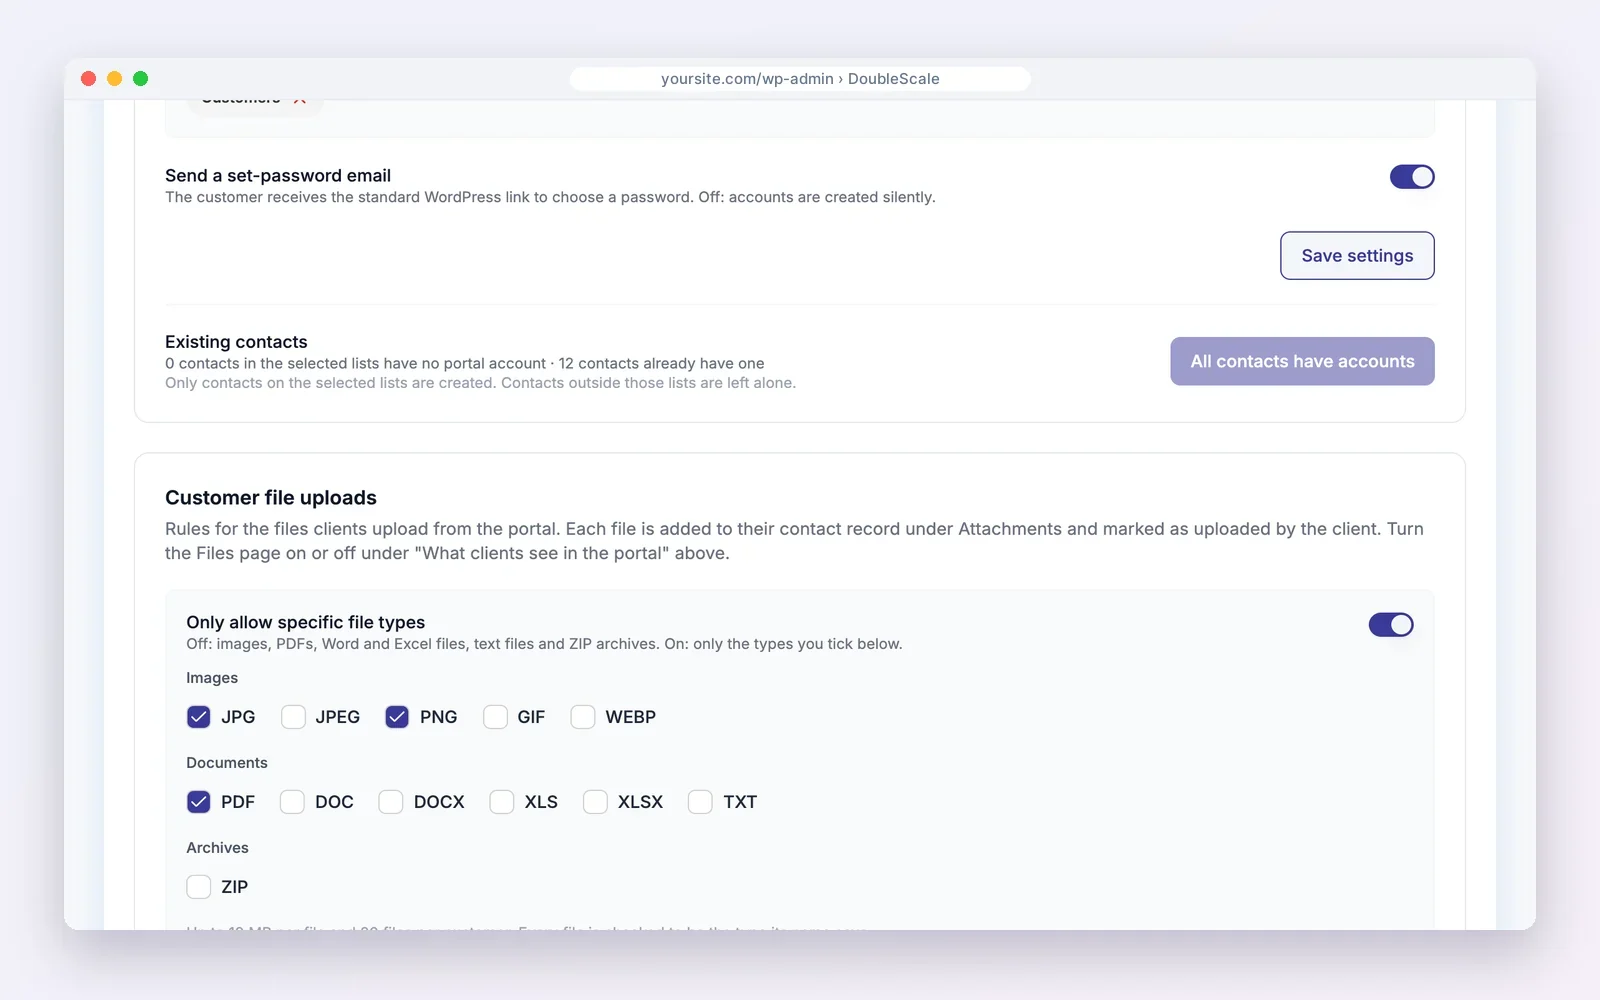
- By default clients can upload images, PDFs, Word and Excel files, text files and ZIP archives.
- Turn on Only allow specific file types to tick exactly which ones you accept. Many agencies allow only PDF, JPG and PNG.
- Each file can be up to 10 MB, with up to 20 files per client, and every file is checked to be the type its name says. That blocks a common trick of renaming a script to invoice.pdf.
Step 6: Write a welcome message
The Welcome message is the line clients read under “Welcome back” at the top of their portal. It is a small touch that makes the portal feel like part of your service rather than software.
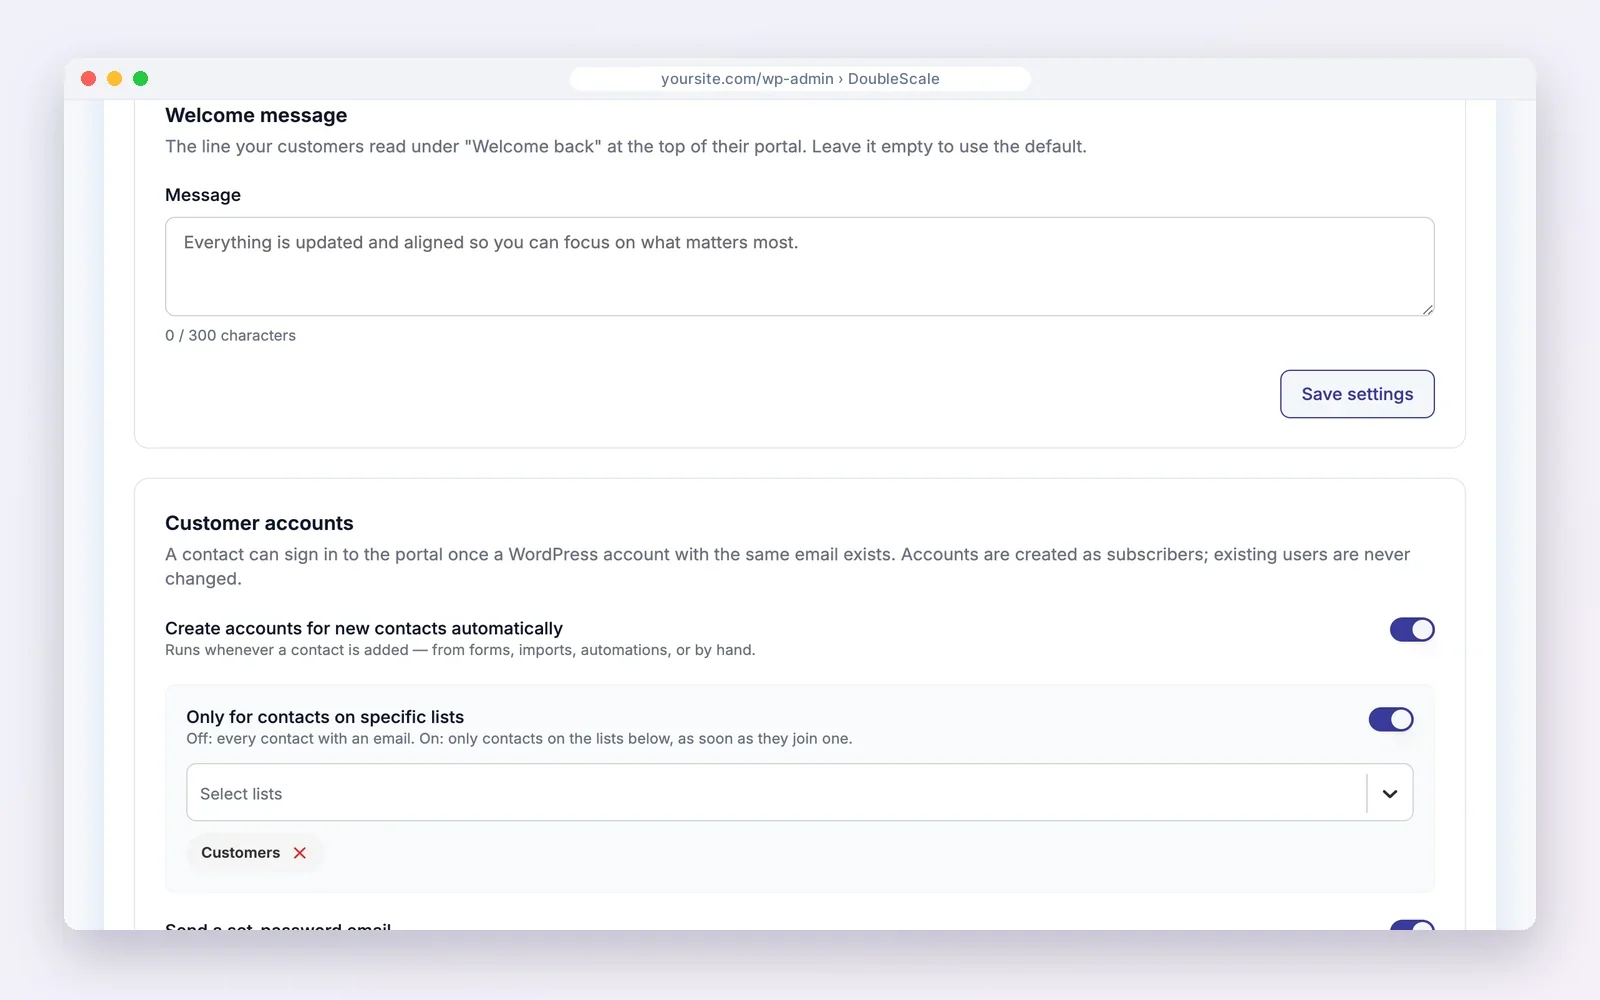
Use it for something useful: your support hours, a link to book a call, or a note such as “Invoices are due within 14 days; pay online from the Documents page.”
Step 7: Give one client different access
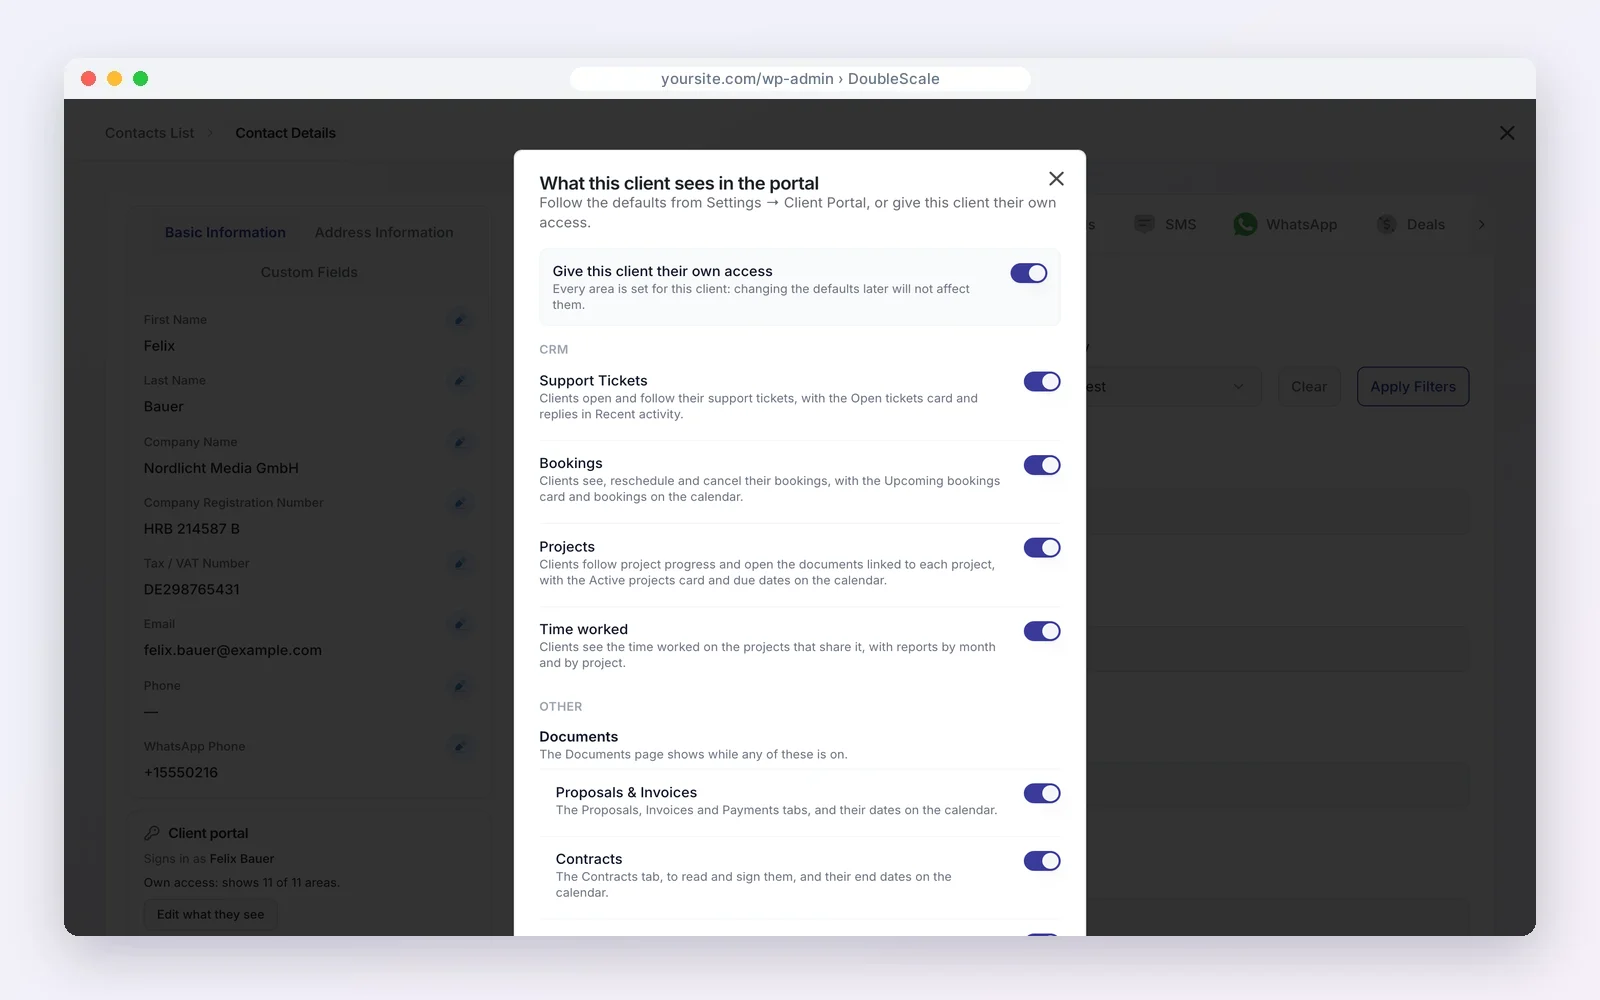
Your defaults suit most clients, but not all. A retainer client might need Projects and Time worked, while a one-off customer only needs their invoices. Open the client’s contact record: the Client portal card shows their login and two buttons, View what they see and Edit what they see.
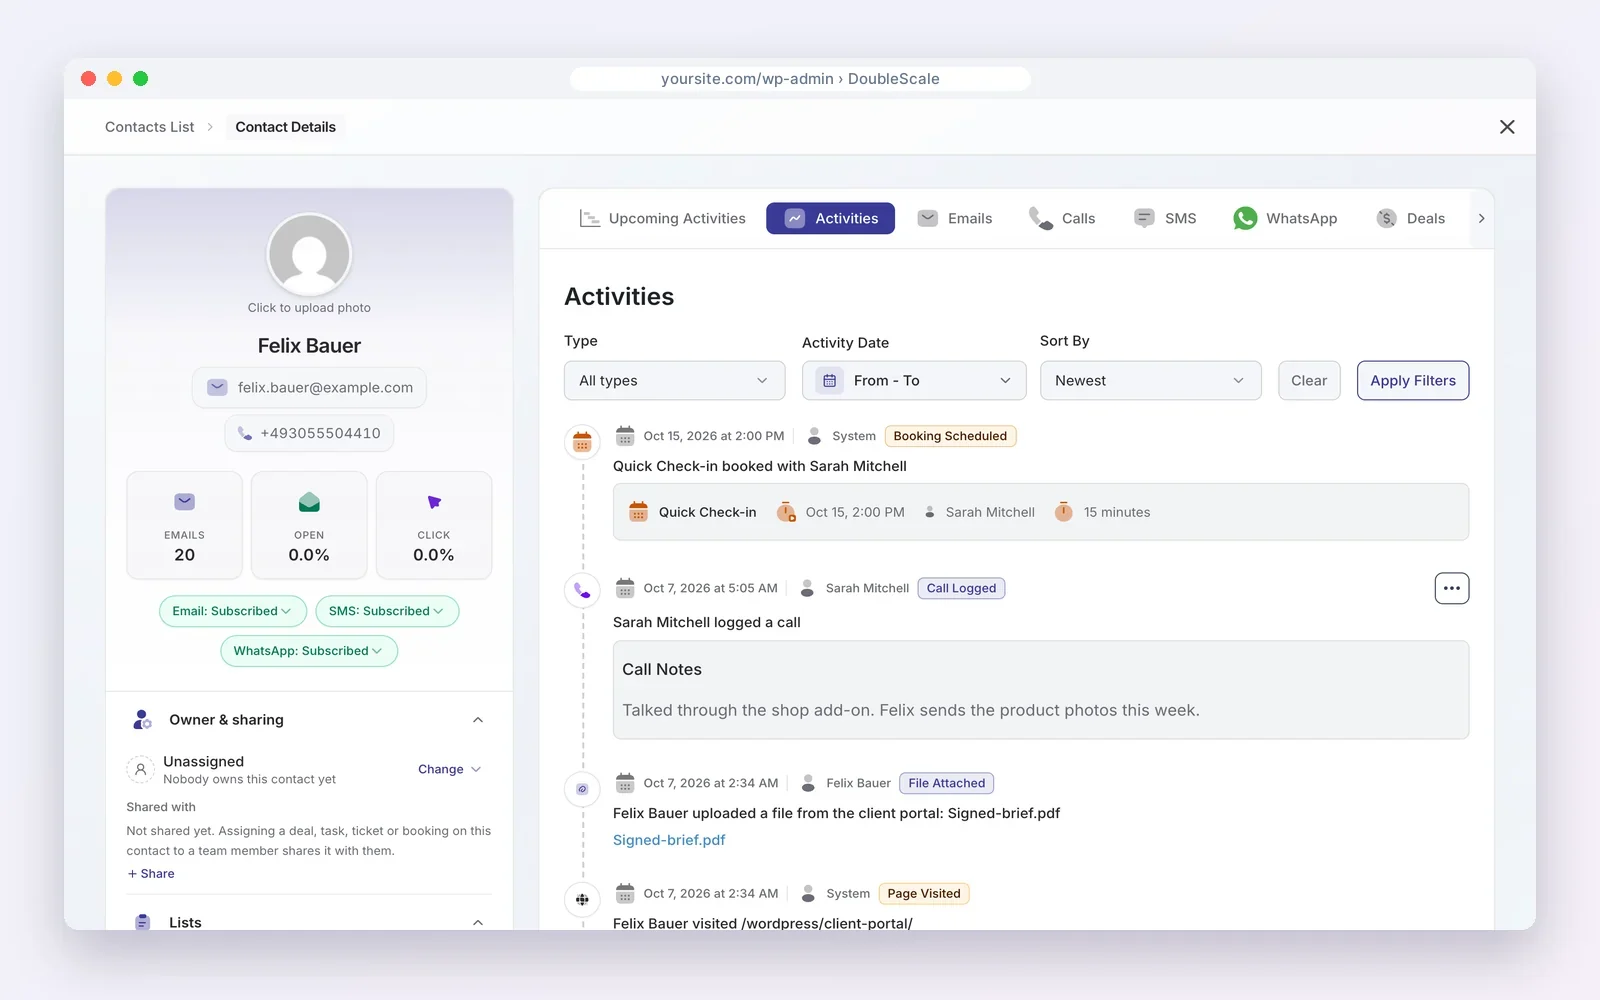
Click Edit what they see and turn on Give this client their own access. Every area can now be set for this client alone, and later changes to your defaults will not affect them.
Step 8: Choose what clients see in each project
Projects have their own visibility settings, so you can be transparent with one client and keep internal work private for another. Open a project, click Edit project, and scroll to the bottom of the fee schedule:
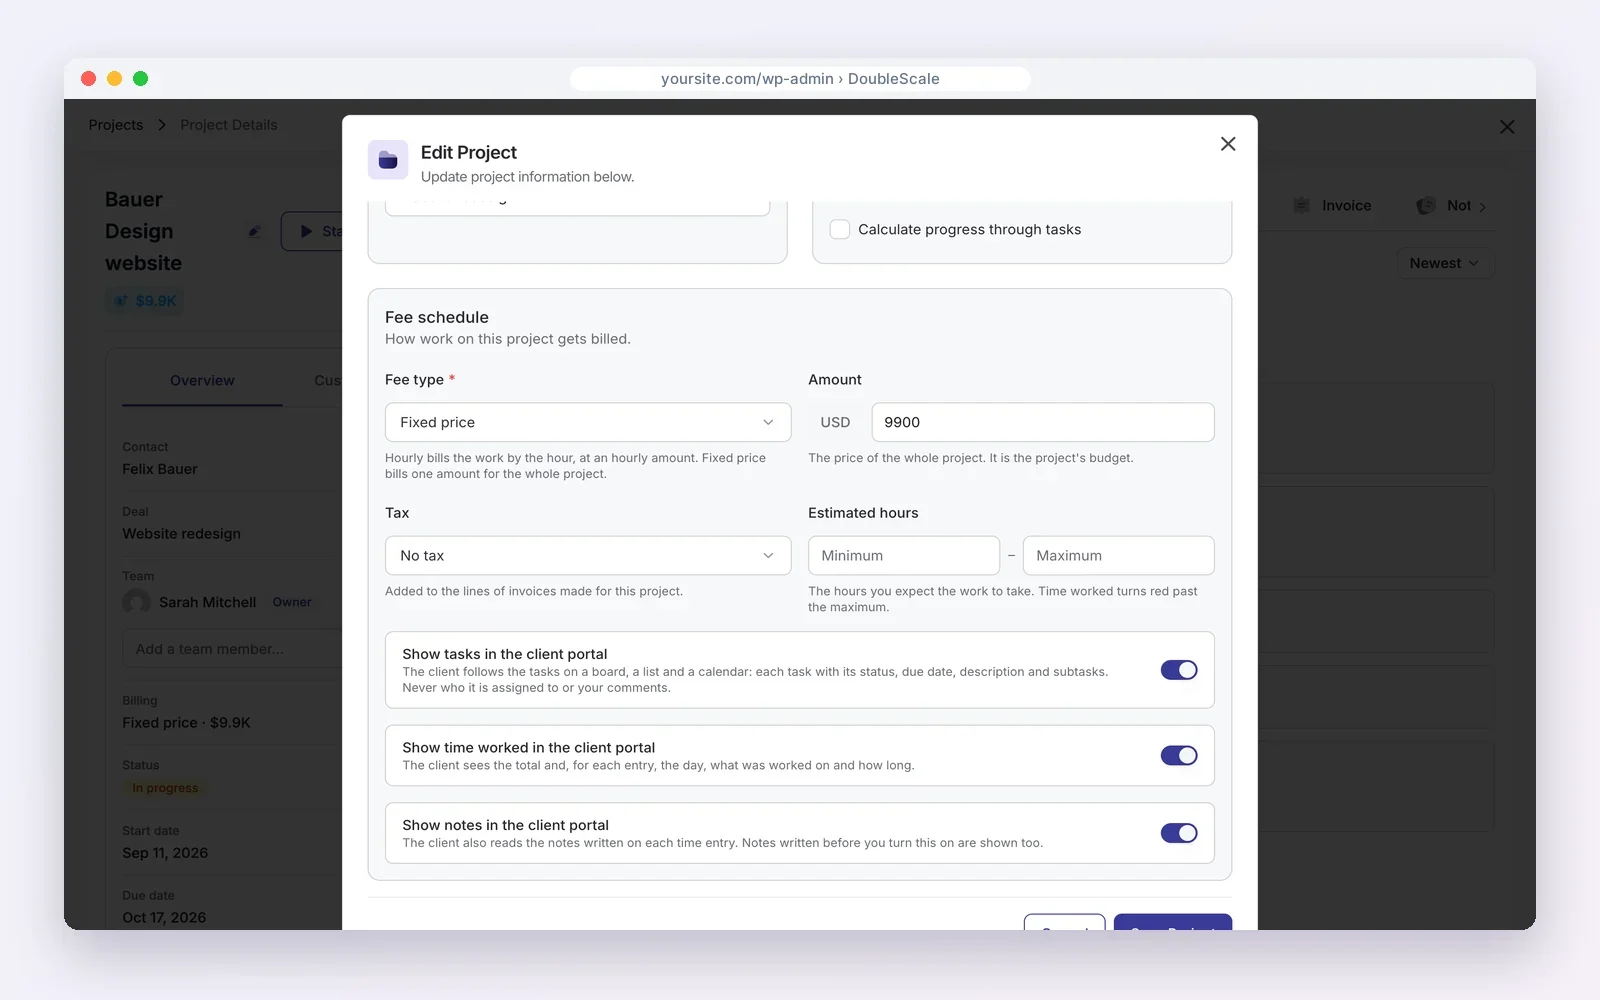
- Show tasks in the client portal: the client follows tasks on a board, a list and a calendar, with status, due date, who it is assigned to, description and subtasks. Your task comments stay with your team unless you mark one Visible to client.
- Show time worked in the client portal: the client sees the total and, for each entry, the day, what was worked on and how long. Useful for hourly and retainer work.
- Show notes in the client portal: the client also reads the notes on each time entry, including notes written before you turn it on, so read through them first.
Step 9: Test the portal as a client
Before you invite anyone, test the portal with a dummy client. Create a contact with an email address you control, add a test invoice and a test ticket, then open the portal page in a private browser window.
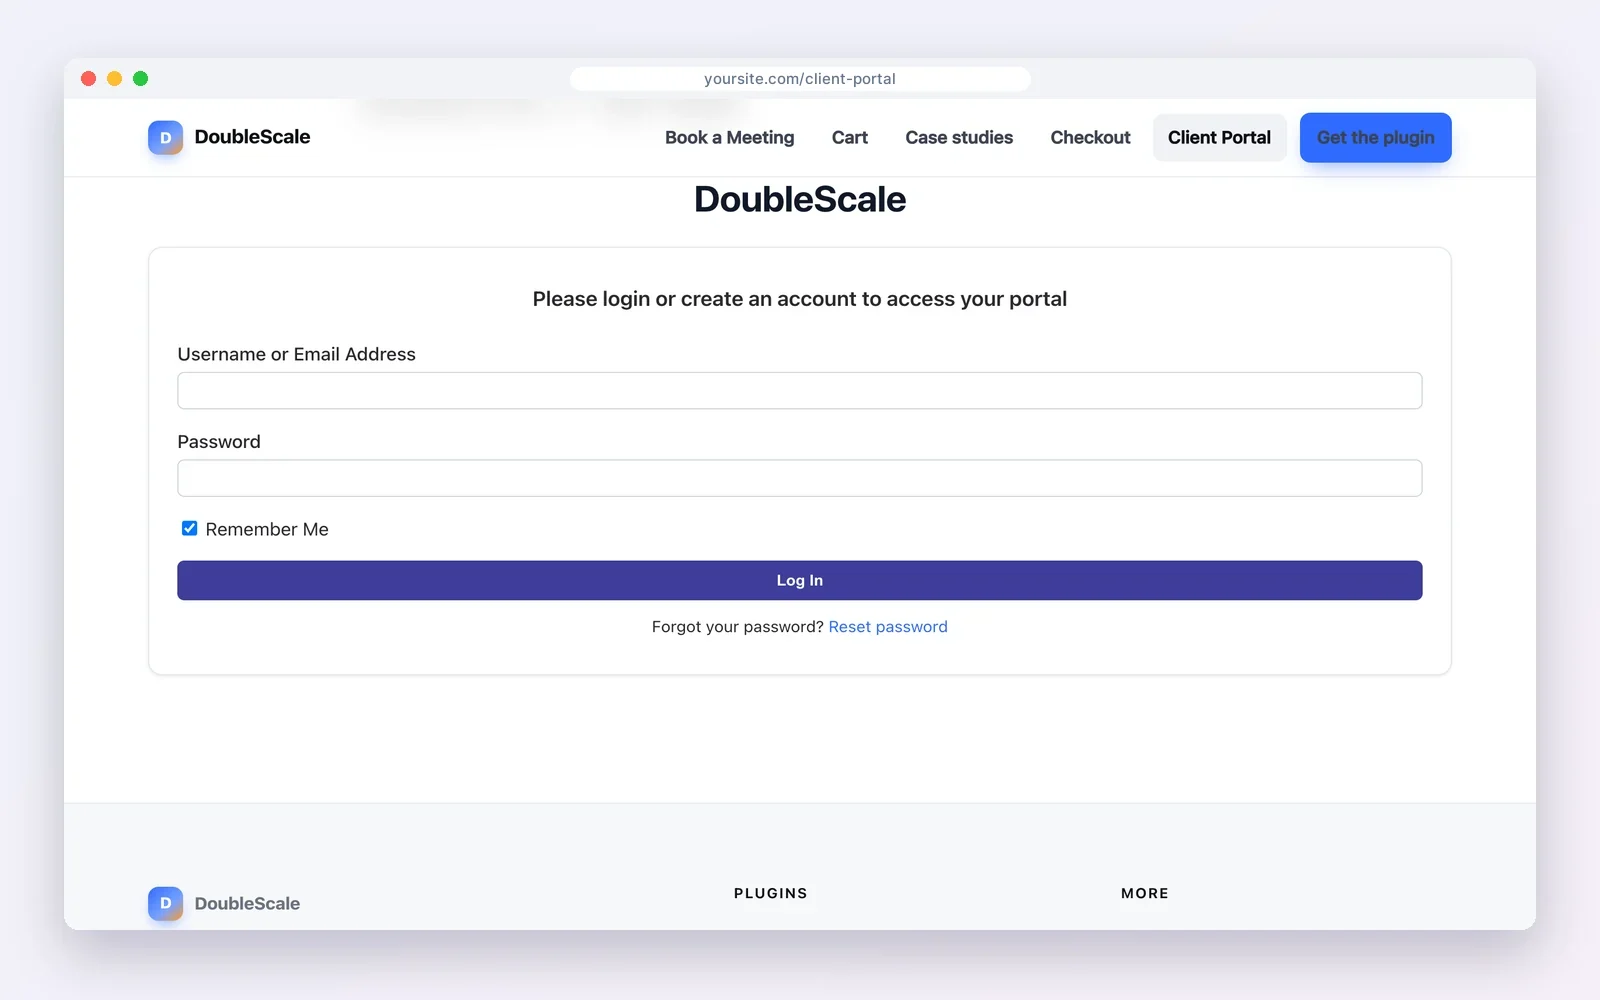
You can also click View what they see on any contact record to preview their portal without logging out. Check three things: the menu shows only the areas you switched on, the documents belong to that client, and the emails arrive in the inbox rather than spam.
What your clients see: a tour of the portal
Once a client logs in, they land on a dashboard that answers the question “what do I need to do?” before anything else.
Dashboard and calendar
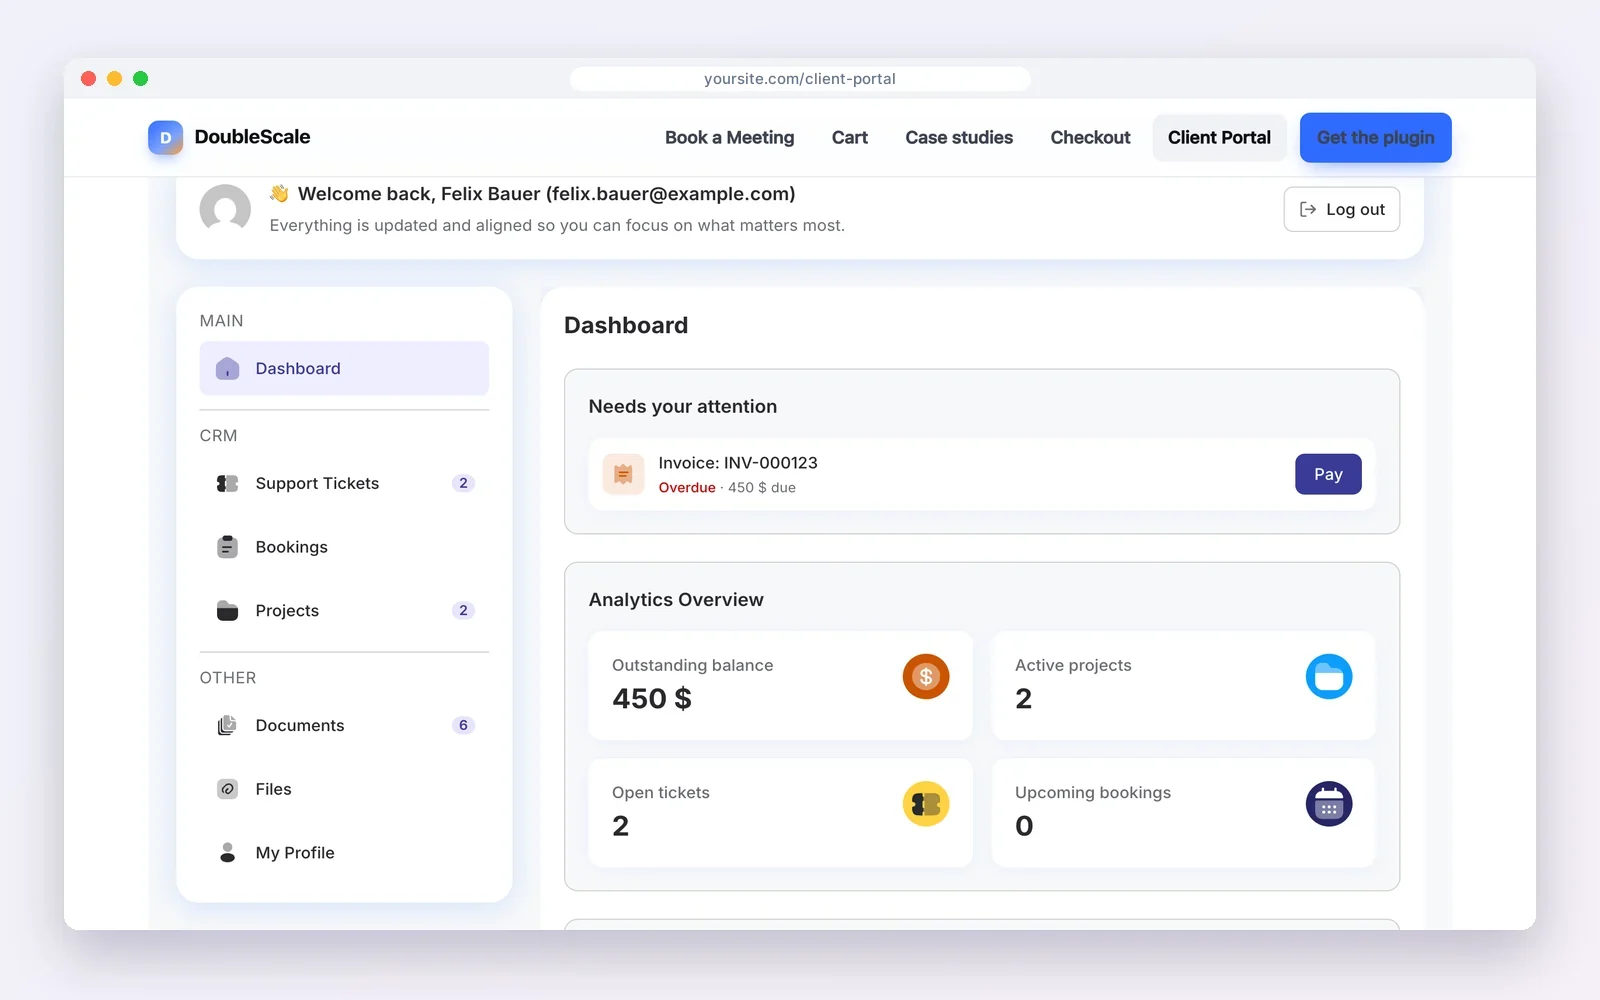
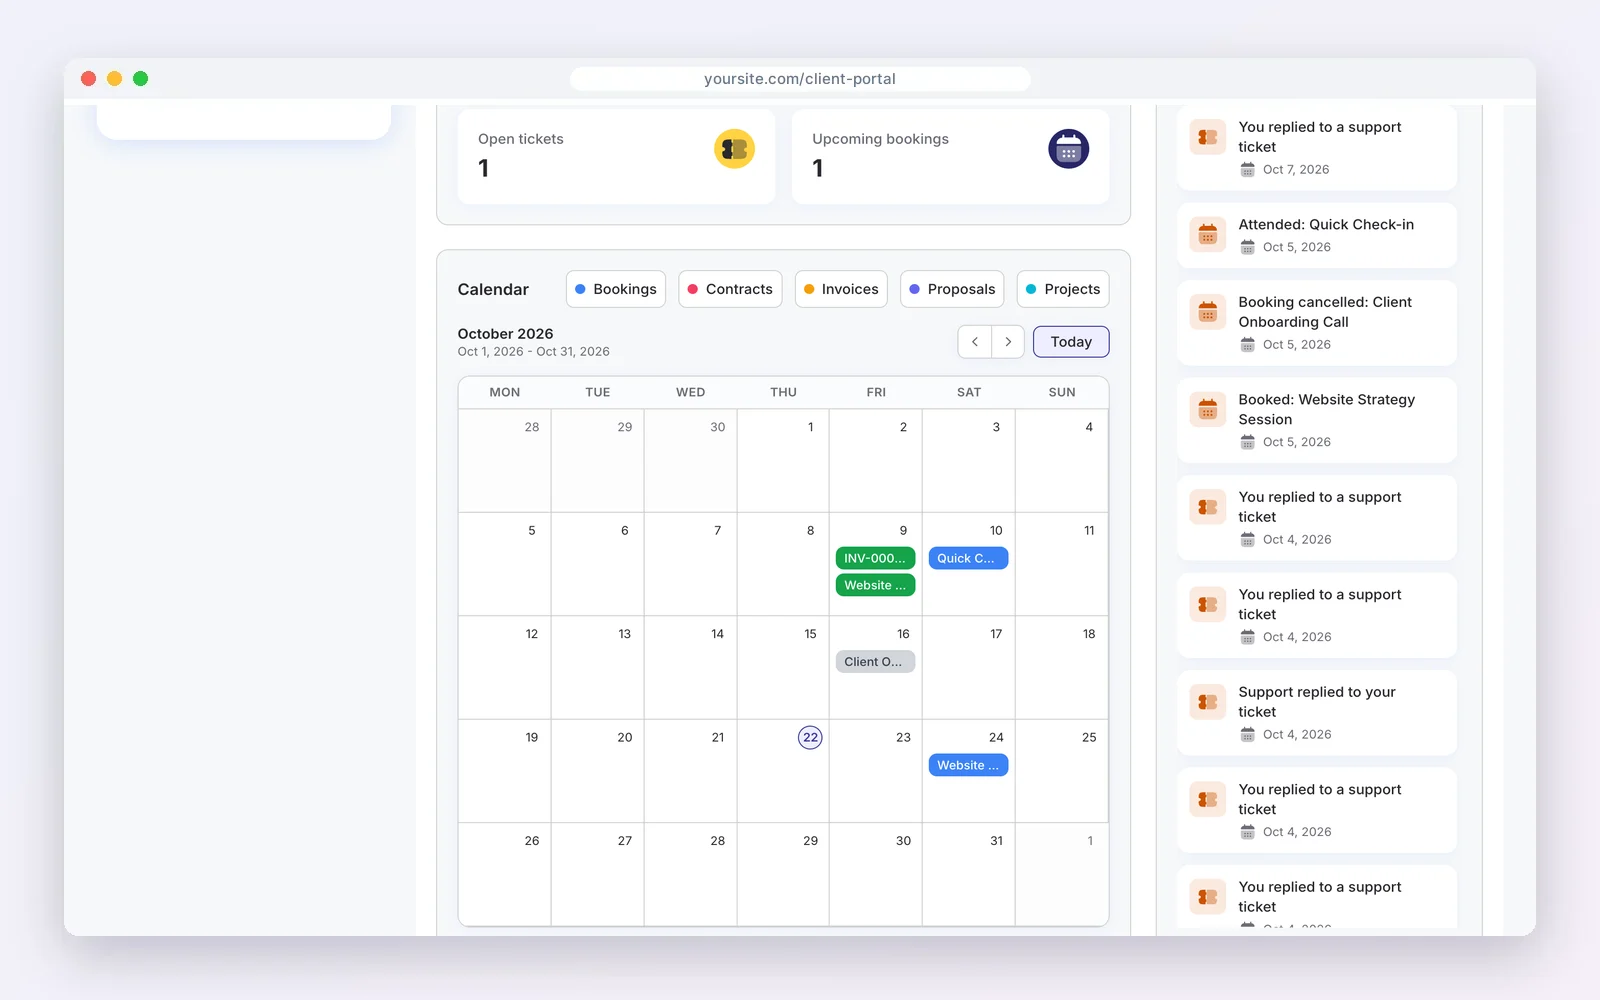
The Needs your attention section lists overdue invoices and documents waiting for a decision. Below it, cards summarise the outstanding balance, active projects, open tickets and upcoming bookings. A calendar brings every date together: bookings, contracts, invoices, proposals and project deadlines.
Projects
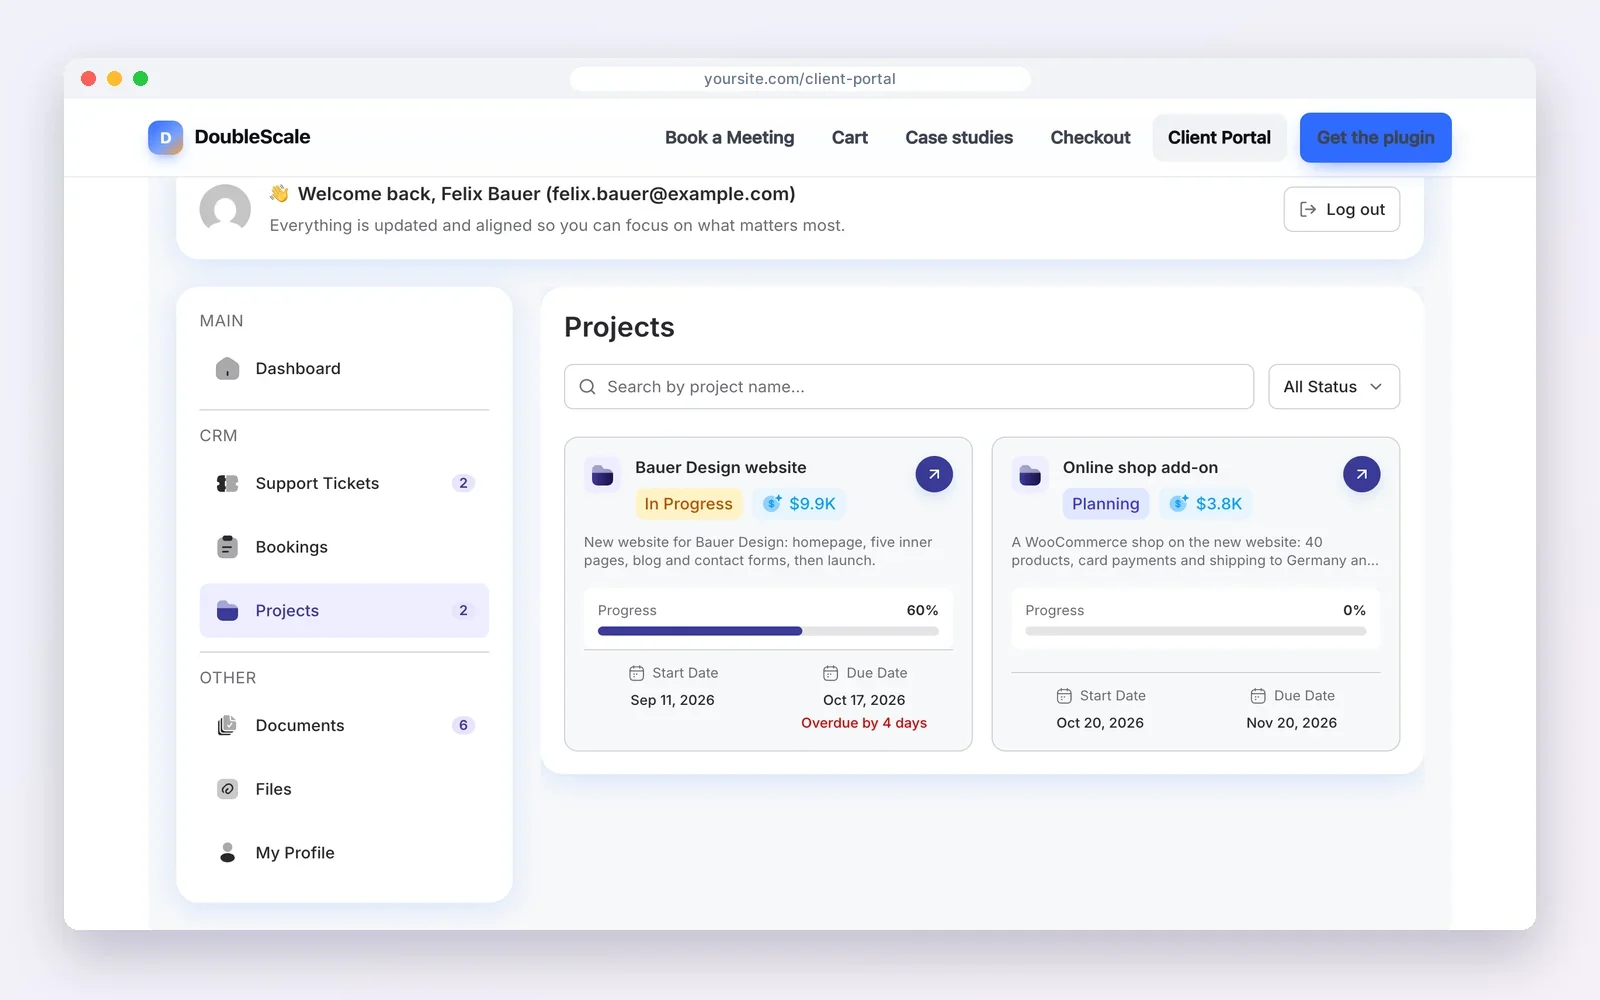
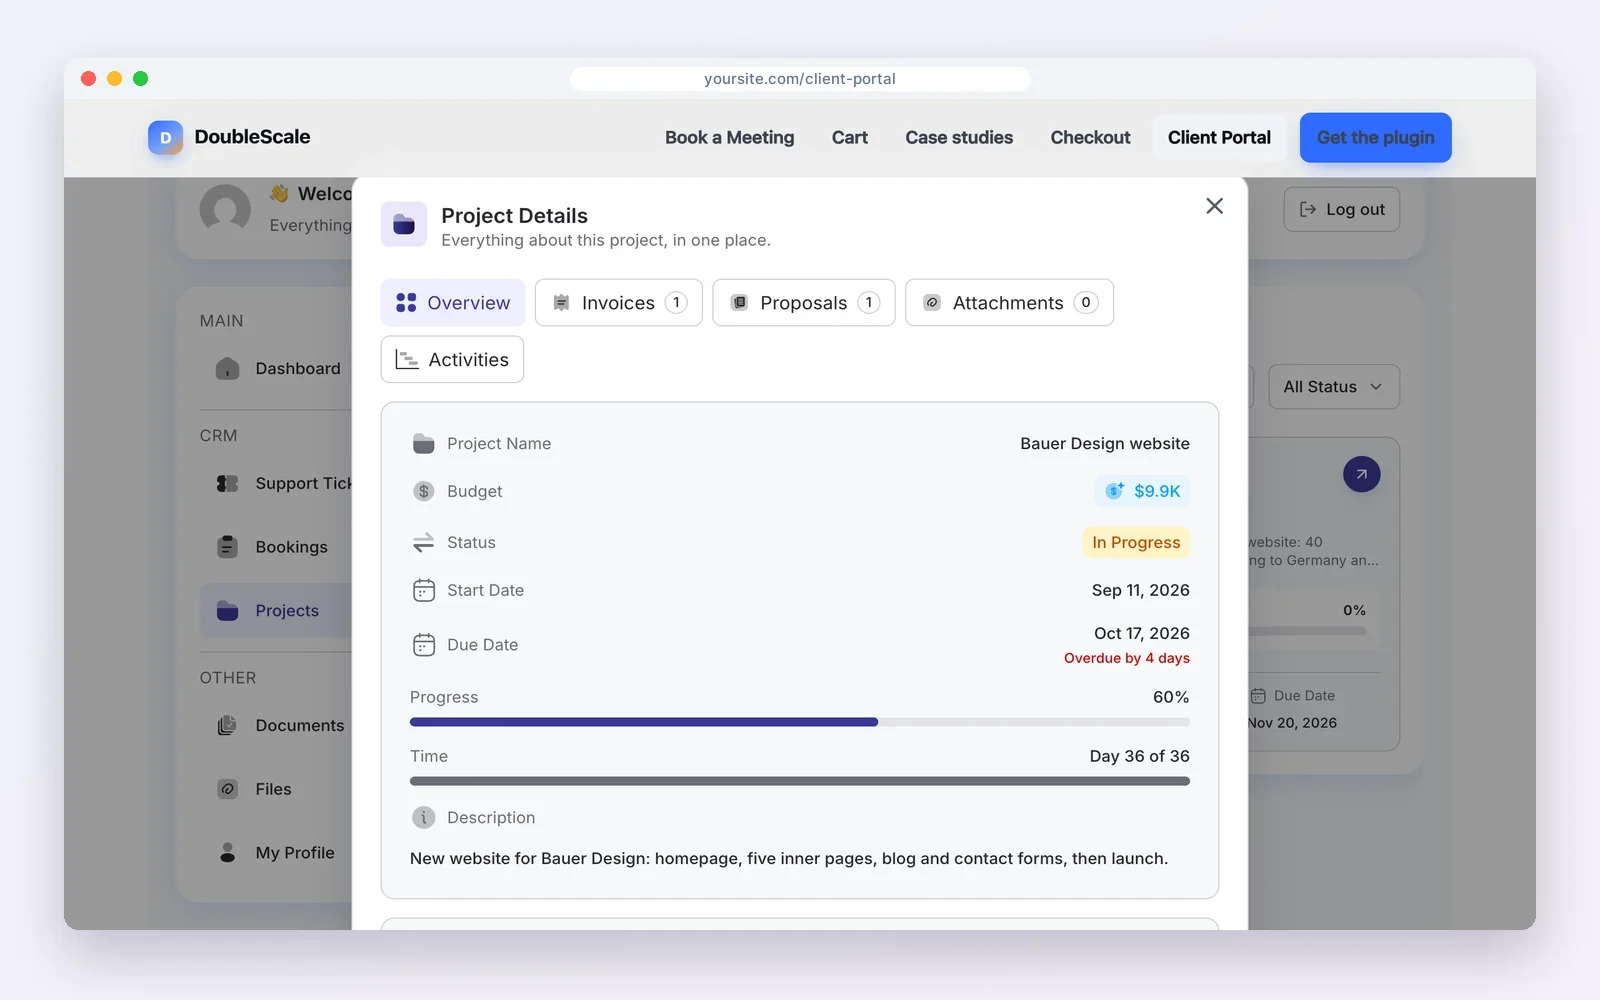
Clients see every project they are part of, with progress and dates. Opening a project shows its details, the linked invoices and proposals, attachments and an activity timeline, so they can see what happened without asking.
Documents: proposals, invoices and contracts
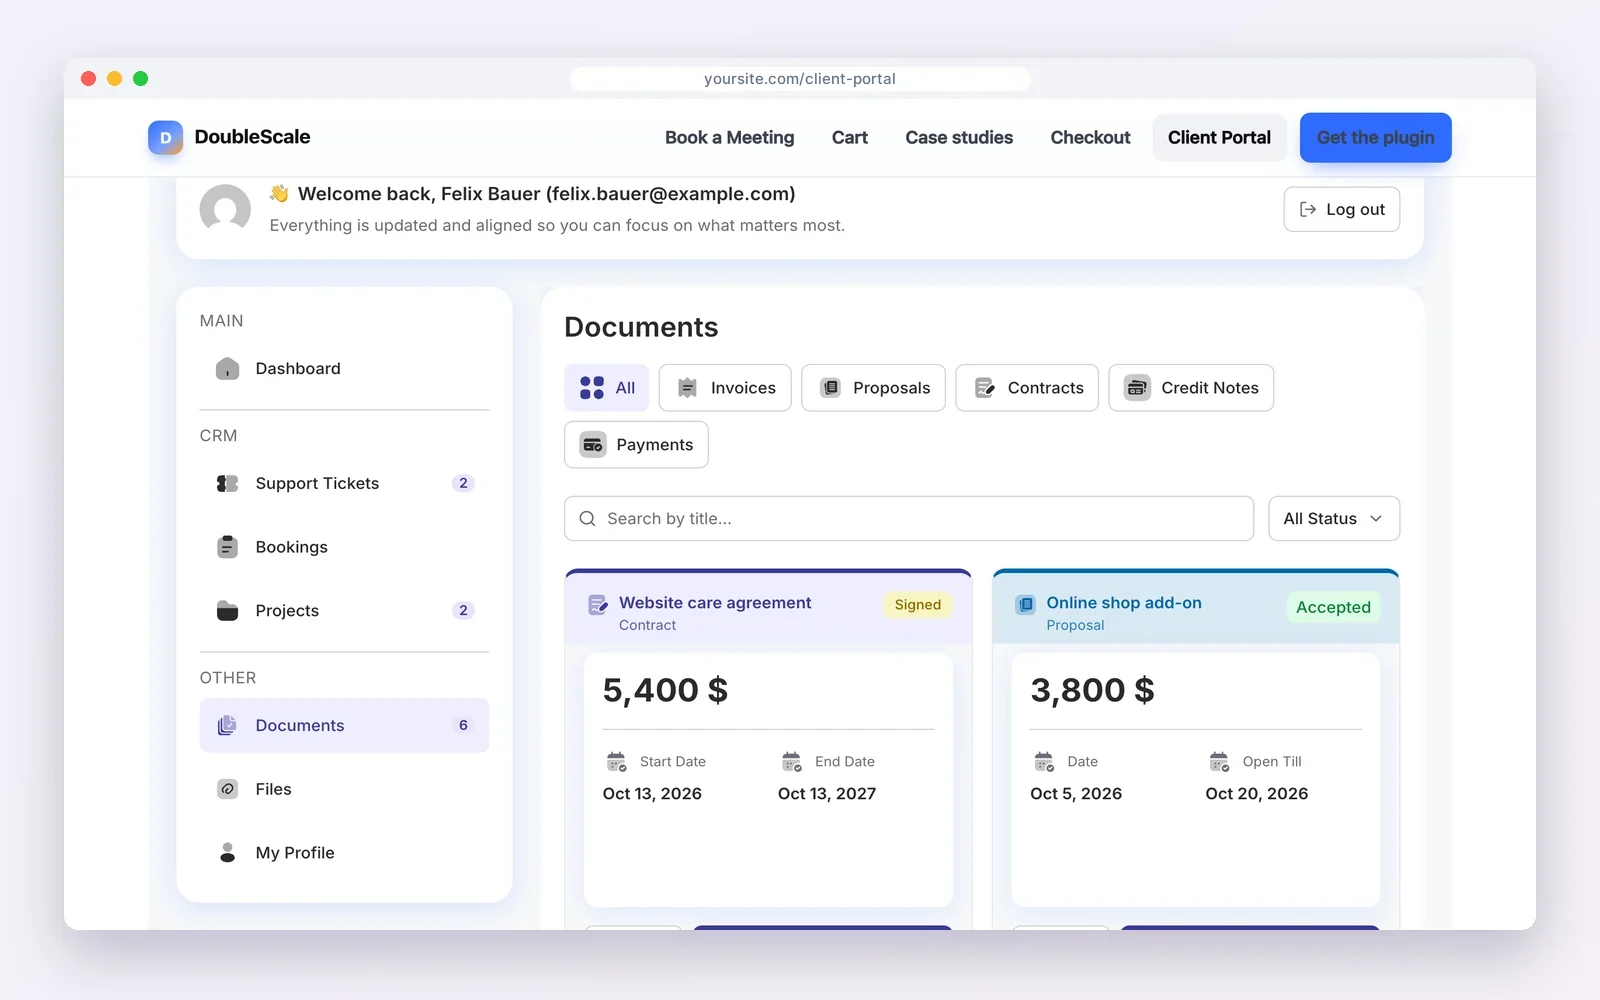
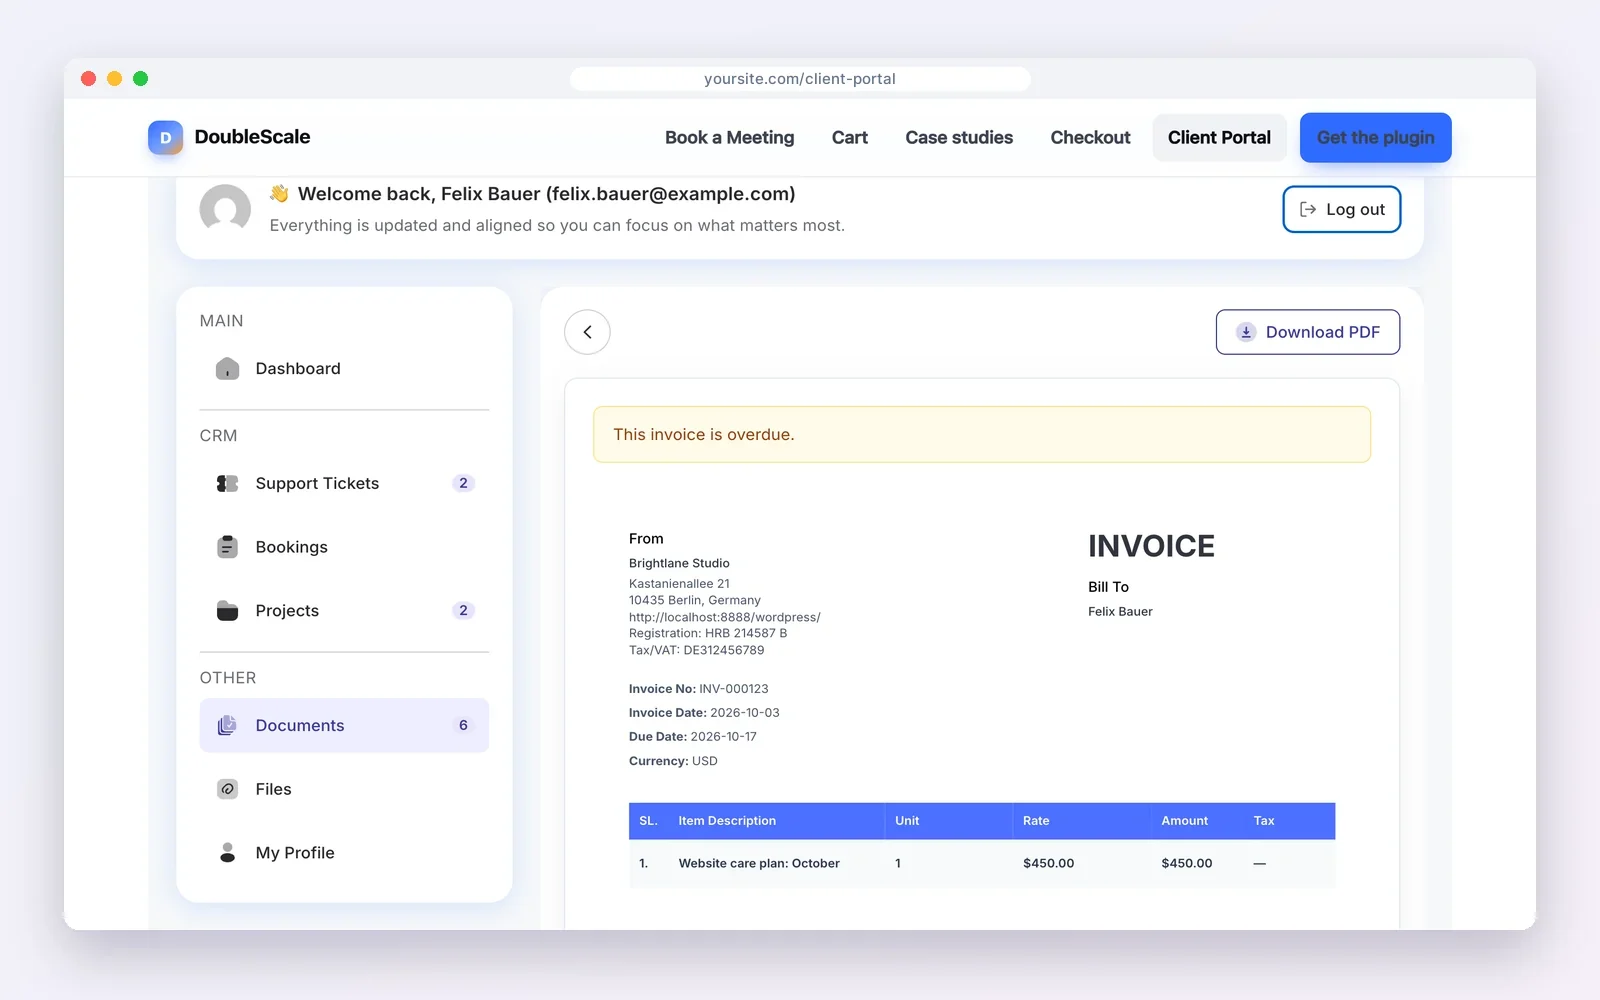
The Documents page collects proposals, invoices, contracts, credit notes and payments. Each card shows the amount, status and key dates, with buttons to view or download the PDF.
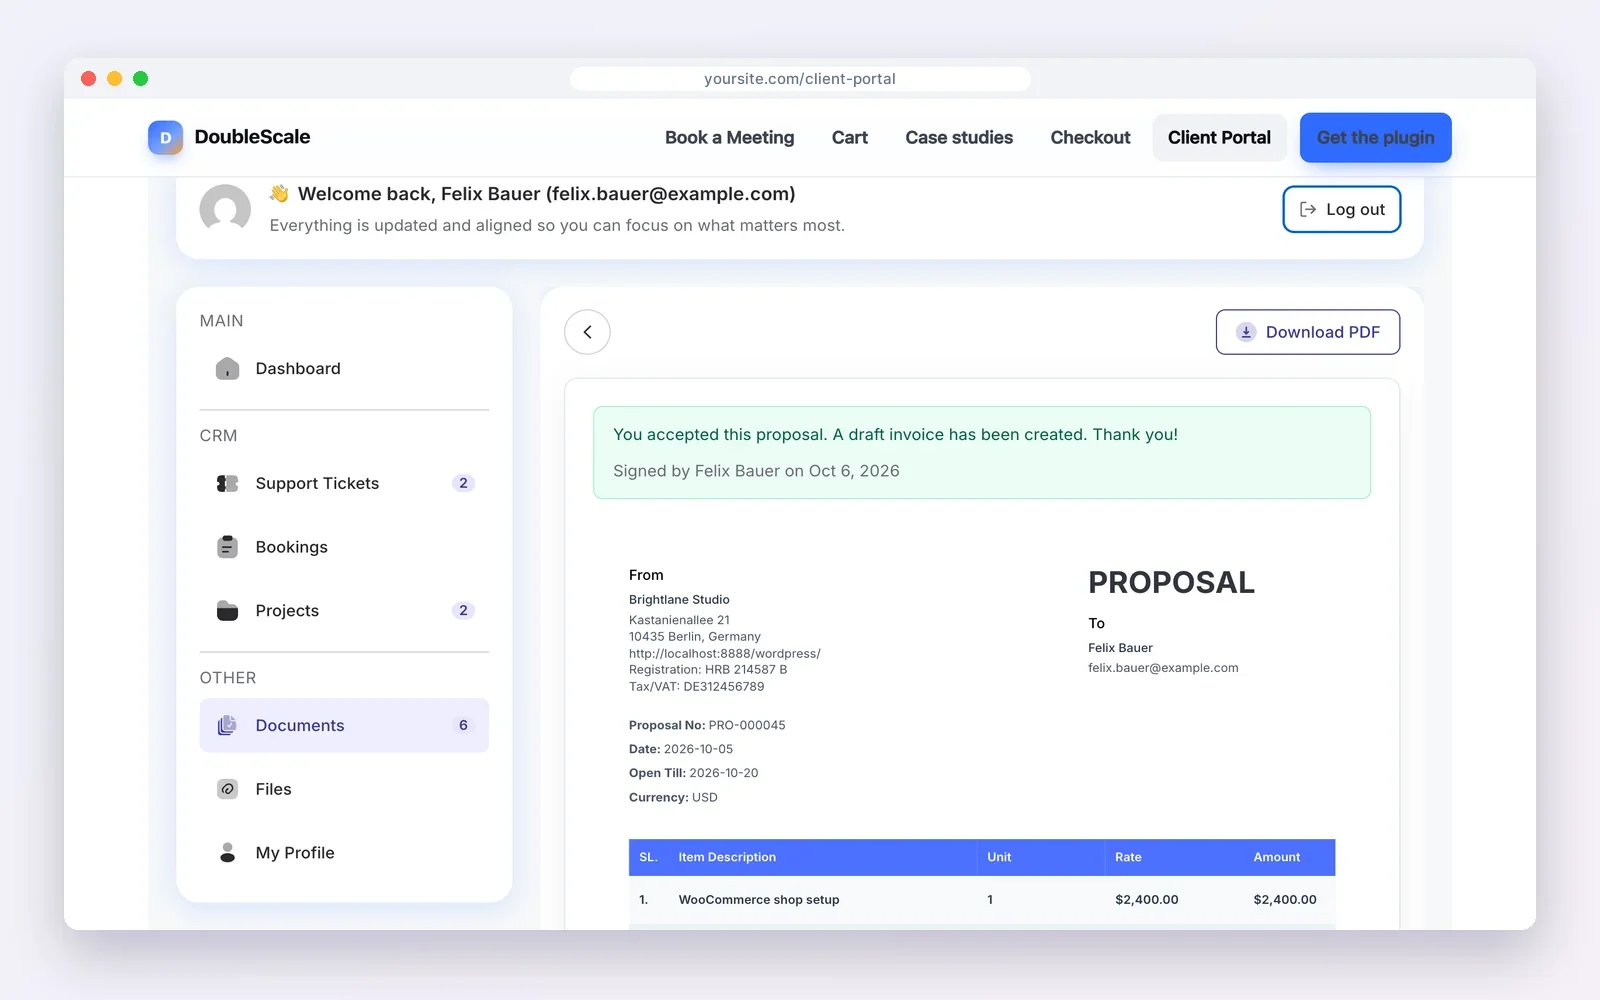
When a client accepts a proposal from the portal, their signature and the date are recorded, and DoubleScale creates a draft invoice for your team. On paid plans, clients can pay invoices online with Stripe, PayPal, Mollie, Razorpay, Square or Authorize.Net, and sign contracts electronically.
Support tickets
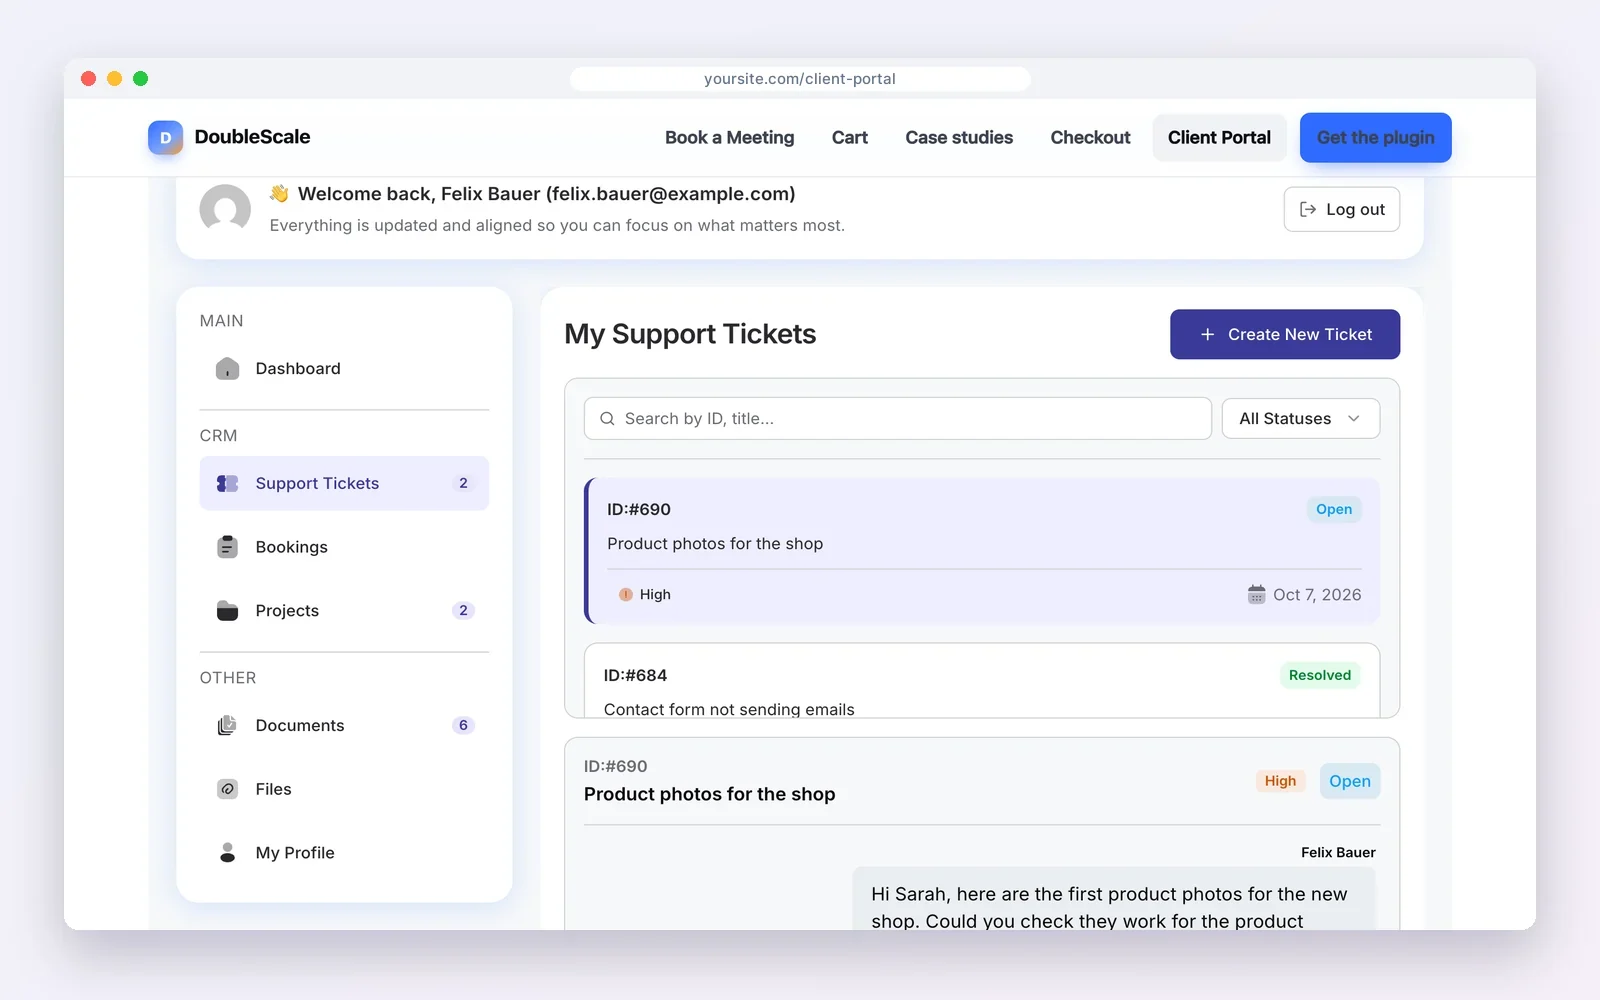
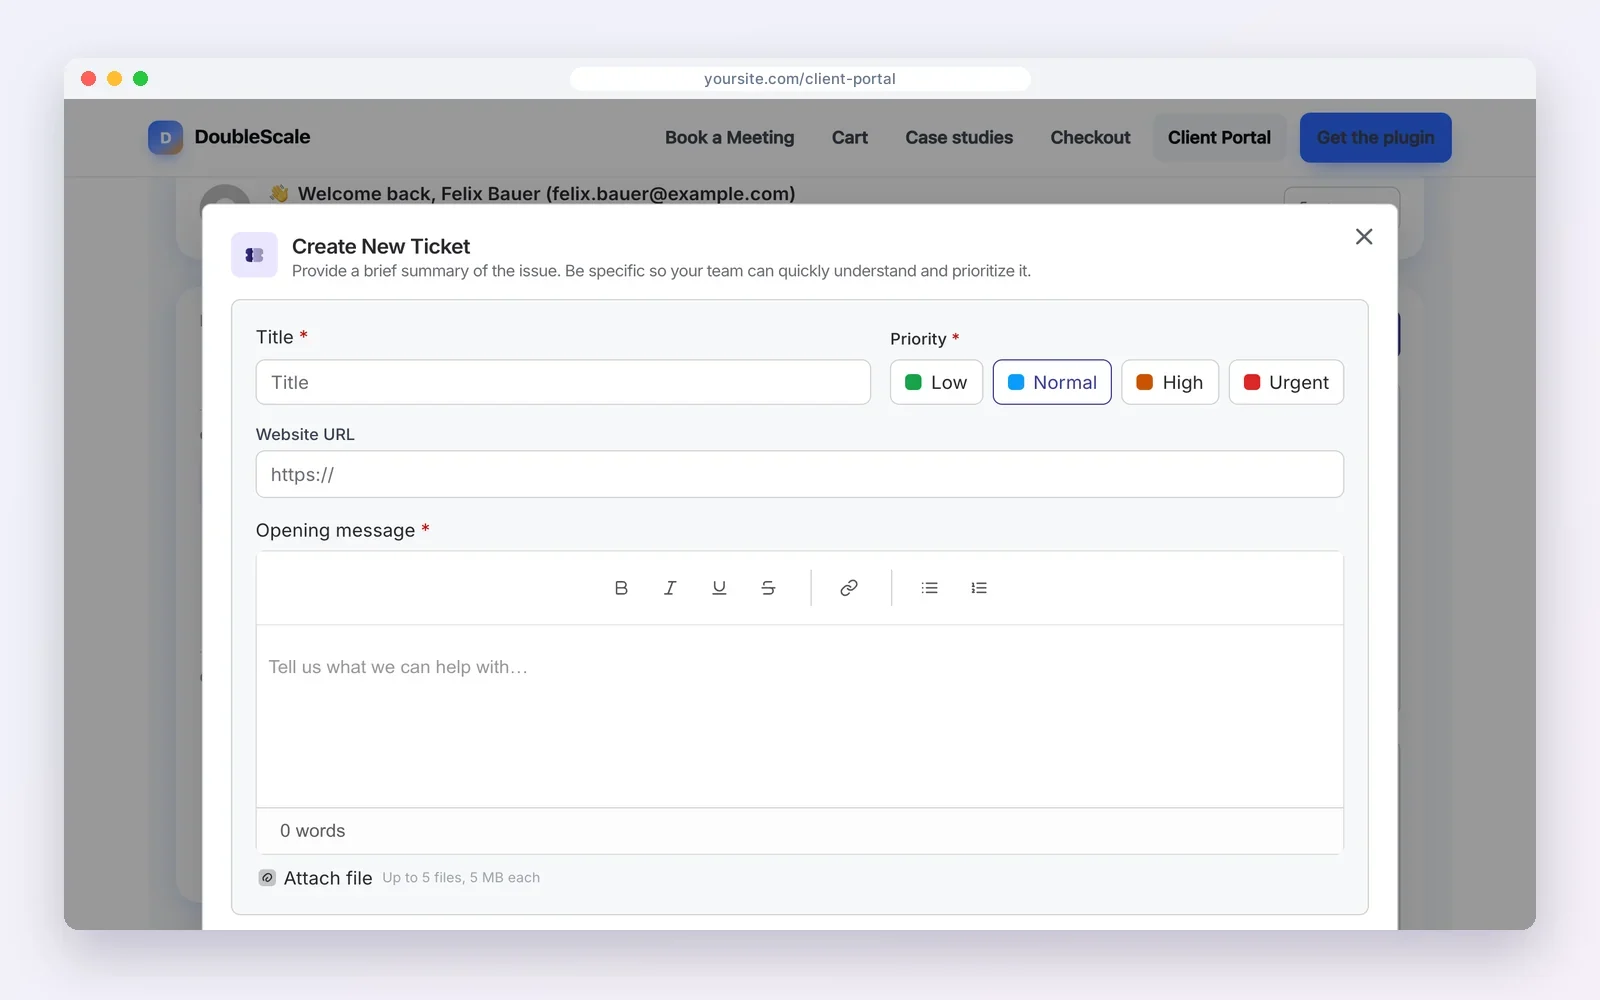
Clients open tickets from the portal instead of emailing a personal inbox. They choose a priority, add the page URL if it is a website issue, and attach screenshots. Your team answers from the helpdesk in WordPress, and the client sees the reply in the portal and by email. For a full helpdesk setup, see how to set up support tickets in WordPress.
Bookings, files and profile
How to launch the portal to existing clients
A portal only saves time if clients use it. Launch it deliberately:
- Create accounts in one go. In Customer accounts, use the button that creates accounts for existing contacts on your Customers list.
- Send a short announcement. Explain the benefit for them, not for you: “You can now see every invoice, approve proposals and follow your project in one place.”
- Link to it everywhere. Add the portal link to invoice emails, your email signature and your website menu.
- Redirect requests. For the first month, answer “can you resend the invoice?” with the portal link. Habits change quickly.
A simple announcement you can adapt:
Subject: Your new client portal
Hi {first name}, you now have a private portal where you can see your projects, invoices and proposals, open support requests and book calls with us. Set your password here: {link}. It takes a minute, and you will never have to search your inbox for an invoice again.
Client portal security checklist
- Keep HTTPS on for the whole site, not just the portal page.
- Exclude the portal page from page caching and CDNs that cache HTML, so no client ever sees a cached copy of someone else’s page.
- Add two-factor authentication for administrators and staff with a trusted security plugin.
- Limit upload file types to what you need (Step 5).
- Keep WordPress, your theme and plugins updated, and take daily backups that include the database.
- Remove portal access promptly when a client relationship ends, and include the portal in your privacy policy.
Common mistakes to avoid
- Switching everything on at once. Too many menu items confuse clients. Start with the 3 to 5 areas they ask about.
- Giving portal access to every lead. Use the list filter in Customer accounts so only customers get logins.
- Ignoring email deliverability. If the set-password email lands in spam, clients never log in. Set up SMTP first.
- Sharing internal notes by accident. Check the project switches in Step 8 before turning on tasks and notes.
- Not testing as a client. Always preview with a dummy account before inviting real clients.
Troubleshooting
| Problem | Likely cause | Fix |
|---|---|---|
| Client is sent back to the login page after signing in | The portal page is cached | Exclude the portal page (and logged-in users) from your cache plugin and CDN |
| Client never received the password email | WordPress mail goes to spam or is not sent | Set up an SMTP provider and resend from the contact record |
| An area is missing from the client’s menu | The area is off, its module is off, or the client has their own access | Check Settings → Client Portal, then the client’s “Edit what they see” |
| The portal page shows a 404 error | The page was deleted or its address changed | Use Create page in Settings → Client Portal, or paste the shortcode on a page |
| Upload rejected | File type not allowed or larger than 10 MB | Adjust the allowed types or ask the client to compress the file |
Free vs paid: what you can do on each plan
The client portal itself is free. Paid plans add the areas most agencies and service businesses use for ongoing work.
| Free plugin | Paid plans (from $99/year) | |
|---|---|---|
| Portal page, logins and welcome message | Included | Included |
| Automatic client accounts and per-client access | Included | Included |
| Support tickets and bookings | Included | Included |
| Proposals, invoices and outstanding balance | Included | Included |
| Online invoice payments (Stripe, PayPal and more) | Not included | Included |
| Projects, tasks and time worked | Not included | Included |
| Contracts with e-signature and credit notes | Not included | Included |
| Client file uploads | Not included | Included |
DoubleScale pricing page, October 21, 2026. Paid plans: Basic $99, Plus $199 and Enterprise $399 per year.
Comparing other approaches before you commit? Our review of the best WordPress client portal plugins covers free and paid alternatives, and best CRMs with a client portal covers hosted CRMs.
Questions people ask
Can WordPress be used as a client portal?
Yes. With a plugin that adds logins and per-client content, WordPress can host a full client portal on your own domain, where each client sees only their own projects, invoices, tickets and files.
Is there a free WordPress client portal plugin?
Yes. DoubleScale includes a free client portal with logins, support tickets, bookings, proposals, invoices and per-client access. Paid plans add projects, contracts, online payments and file uploads.
How do clients log in to a WordPress client portal?
Each client gets a WordPress account with the Subscriber role, created automatically when they become a contact. They set their own password from an email link and log in on your portal page.
Can clients see each other's information?
No. Every area of the portal only shows records linked to the logged-in client’s contact, and clients cannot access the WordPress dashboard.
Can clients pay invoices in the portal?
Yes, on paid plans. Clients pay online with Stripe, PayPal, Mollie, Razorpay, Square or Authorize.Net. On the free plan they can view and download their invoices.
Can I control what each client sees?
Yes. Set defaults for all clients in Settings → Client Portal, then give any client their own access from their contact record. Projects also have their own switches for tasks, time and notes.
Does the portal match my theme?
Yes. The portal is a normal WordPress page using a shortcode, so it appears inside your theme’s header and footer, and you can change its address and menu position.
Is a WordPress client portal secure?
It is as secure as your site. Use HTTPS, keep WordPress updated, exclude the portal from caching, add two-factor login for staff and limit upload file types.
Free on WordPress.org: logins, tickets, bookings, proposals and invoices. Add projects, contracts and online payments when you need them.
Get our guides first on GoogleAdd DoubleScale as a preferred source and our articles show up more often in your Top Stories.

DoubleScale Team, Editorial team
The DoubleScale team builds the all-in-one CRM for WordPress. We test the tools we write about and check every price and feature on the vendor's own pages before we publish.
Practical CRM tips, once a month
Guides on growing with WordPress: lead capture, email marketing, automations and sales. No spam, unsubscribe anytime.